Rear hub bearings - renewal
1 Raise and support the rear of the vehicle on stands (see “Jacking and Vehicle Support”).
Remove the roadwheel and release the handbrake.
2 On fuel-injected models and Van versions undo the retaining screw and withdraw the brake drum from the hub.
3 Tap off the dust cap from the end of the hub (see illustration).
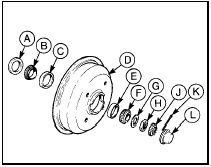
9.3 Exploded view of the rear hub bearings
A Oil seal
B Inboard bearing
C Bearing outer
track
D Hub and drum
E Bearing outer
track
F Outboard bearing
G Thrustwasher
H Retaining nut
J Nut retainer
K Split pin
L Dust cap
4 Extract the split pin and remove the nut retainer.
5 Unscrew and remove the nut and take off the thrustwasher.
6 Pull the hub/drum off the stub axle slightly then push it back. This will now leave the outboard bearing ready to be taken off the stub axle (see illustration).
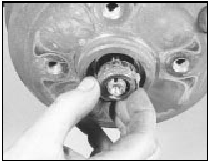
9.6 Rear hub outboard bearing removal
7 Withdraw the hub/drum.
8 Prise the oil seal from the hub and take out the inboard taper roller bearing (see illustration).

9.8 Removing the hub bearing oil seal
9 Using a punch, drive out the bearing outer tracks, taking care not to burr the bearing seats.
10 If new bearings are being fitted to both hubs, do not mix up the bearing components but keep them in their individual packs until required.
11 Drive the new bearing tracks squarely into their hub recesses.
12 Pack both bearings with the specified grease, working plenty into the rollers. Be generous, but there is no need to fill the cavity between the inner and outer bearings.
13 Locate the inboard bearing and then grease the lips of a new oil seal and tap it into position.
14 Fit the hub onto the stub axle, taking care not to catch the oil seal lips.
15 Fit the outboard bearing and the thrustwasher and screw on the nut.
16 Adjust the bearings (Section 8).
17 On fuel-injected models and Van versions refit the brake drum and secure with the retaining screw.
18 Refit the roadwheel and lower the car to the ground.
See also:
Heater - removal and refitting
Removal
1 Disconnect the battery negative lead.
2 Refer to Chapter 11 and remove the centre
console.
3 Working within the engine compartment,
disconnect the coolant hoses from the heater
pipe st ...
Starter motor - testing in the car
Note: Refer to the precautions given in
“Safety first!” and in Section 1 of this Chapter
before proceeding.
1 If the starter motor fails to operate when the
ignition key is turned to the appropria ...
AM/FM radio with compact disc player
Volume/power control
Ensure that the ignition switch is in
the ACC or ON position.
Press the control to turn the audio
system on. Turn the control to raise
or lower the volume.
Press the ...
