Expansion tank and coolant level sensor - removal and refitting
Removal
1 With the engine cold, slowly unscrew the
expansion tank cap to release any remaining
pressure from the cooling system. Remove
the cap.
2 Place a suitable container beneath the expansion tank.
3 Disconnect and plug the upper hose.
4 Where applicable, disconnect the coolant level sensor wiring plug.
5 Unscrew the expansion tank securing screws, and tilt the tank so that the coolant runs to the sealed end.
6 Disconnect and plug the lower hose.
7 Drain the expansion tank into the container and remove the tank.
8 Where applicable, the coolant level sensor can be removed from the tank by unscrewing the collar from the sensor, then withdrawing the spacer, sensor and seal (see illustration).
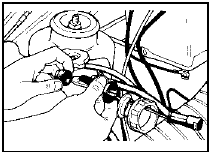
15.8a Removing the coolant level sensor from the expansion tank
Renew the seal if necessary. Note that the sensor can only be fitted in one position (see illustration).
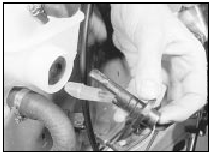
15.8b Fitting the coolant level sensor
Refitting
9 Refitting is a reversal of removal.
10 On completion, top-up the coolant level to the maximum mark, then refit the expansion tank cap and run the engine at a fast idling speed for several minutes. Check the expansion tank for leaks, then stop the engine and if necessary top-up the coolant level.
See also:
Brake components check (Every 36 000 miles or 3 years)
1 Inspect the thickness of the friction linings
on the disc pads and brake shoes (as
described earlier in this Chapter) at the
intervals specified.
2 The rigid and flexible hydraulic pipes and
ho ...
Radio/cassette player and graphic equaliser - removal and
refitting
Note: The information in this Section applies to
Ford original equipment fitment components.
Radio
Early models
Removal
1 Disconnect the battery.
2 Pull off the control knobs, the tuning knob
s ...
Bulbs
Replacing exterior bulbs
Check the operation of all the bulbs frequently.
Using the right bulbs
Replacement bulbs are specified in the chart below. Headlamp bulbs
must be marked with an authorized ...
