Sump - removal and refitting
Note: New gaskets and sealing strips must be used on refitting.
Removal
1 Disconnect the battery negative lead and
drain the engine oil (see Chapter 1).
2 Refer to Chapter 5, Part A and remove the starter motor.
3 Unbolt and remove the clutch cover plate.
4 Extract the sump securing bolts and remove the sump. If it is stuck, prise it gently with a screwdriver but do not use excessive leverage. If it is very tight, cut round the gasket joint using a sharp knife.
Refitting
5 Before refitting the sump, remove the front
and rear sealing strips and gaskets. Clean the
mating surfaces of the sump and cylinder
block.
6 Stick new gaskets into position on the block using thick grease to retain them, then install new sealing strips into their grooves so that they overlap the gaskets (see illustrations).
5.6a Sump gasket fitting details at timing cover end (A) and flywheel end (B)
5.6b Fitting the sump gasket sealing strips to overlap the tabs on the gasket
7 Before offering up the sump, check that the gap between the sump and the oil baffle is between 2.0 and 3.8 mm (see illustration).
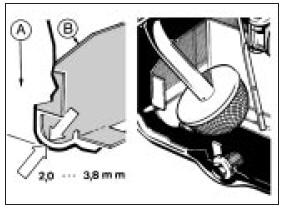
5.7 Sump and oil baffle clearance details
A Sump B Baffle
8 Screw in the sump bolts and tighten in three stages to the specified torque in the sequence shown (see illustration).
a) Stage 1- in alphabetical order b) Stage 2 - in numerical order c) Stage 3 - in alphabetical order
5.8 Sump bolt tightening sequence
9 It is important to follow this procedure in order to provide positive sealing against oil leakage.
10 Refit the clutch cover plate and the starter motor and reconnect the battery.
11 Refill the engine with the correct grade and quantity of oil.
See also:
Specifications
System type . . . . . . . . . . . . . . . . . . . . . . . . . .
. . . . . . . . . . . . . . . . . Diagonally split dual circuit, hydraulic with
pressure regulating
valve to rear brakes. Servo ass ...
Fluid leak check (Every 6000 miles (10 000 km) or 6 months)
1 Visually inspect the engine joint faces,
gaskets and seals for any signs of water or oil
leaks. Pay particular attention to the areas
around the rocker cover, cylinder head, oil
filter and sump ...
Auxiliary drivebelt check (Every 12 000 miles (20 000 km) or 12 months)
1 Refer to the Specifications at the beginning
of this Chapter and check the tension of each
drivebelt at the point stated. Check the full
length of each drivebelt for cracks and
deterioration. It ...
