Rear wheel cylinder (drum brakes) - removal, overhaul and refitting
Caution: Refer to the precautions in Section 1.
Saloon, Hatchback and Estate
models
1 Chock the front wheels, loosen the relevant
roadwheel nuts, then jack up the rear of the
vehicle and support on axle stands (see
“Jacking and Vehicle Support”). Remove the
roadwheel and release the handbrake.
2 Remove the retaining spire washer(s) from the wheel stud(s) and pull off the brake drum.
If the drum will not pass over the shoes, it is possible to release the automatic adjuster mechanism by inserting a screwdriver through the small hole in the drum and pressing down on the ratchet.
3 Remove the brake fluid reservoir cap and secure a piece of polythene over the filler neck with a rubber band, or by refitting the cap. This will reduce the loss of fluid during the following procedure.
4 Unscrew the union nut and disconnect the fluid pipe from the wheel cylinder (see illustration). Plug the open ends of the pipe and wheel cylinder to prevent fluid loss and dirt ingress.
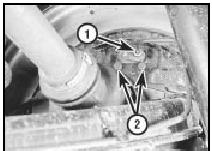
10.4 Fluid pipe union (1) and wheel cylinder retaining bolts (2)
5 Pull the tops of the brake shoes apart so that the self-adjuster mechanism holds them clear of the wheel cylinder.
6 Unscrew the two retaining bolts from the rear of the brake backplate, and withdraw the wheel cylinder and sealing ring.
7 The wheel cylinder can now be dismantled as follows.
8 Prise the dust-excluding rubber seals from the ends of the wheel cylinder, and withdraw the pistons and central spring, identifying the pistons so that they can be refitted in their original positions.
9 Prise the seals from the pistons.
10 Clean all the components in methylated spirit and allow to dry. Examine the surfaces of the pistons and cylinder bore for wear, scoring and corrosion. If evident, the complete wheel cylinder must be renewed, but if the components are in good condition, discard the seals and obtain a repair kit.
11 Dip the new seals in clean brake fluid and fit them to the piston grooves, using fingers only to manipulate them. Ensure that the seal lips face into the wheel cylinder.
12 Carefully insert the pistons and central spring into the cylinder, and fit the dust-excluding rubber seals. Ensure that the pistons are fitted in their original positions.
13 Wipe the brake backplate clean, then fit the wheel cylinder together with a new sealing ring, and tighten the securing bolts.
14 Reconnect the fluid pipe to the wheel cylinder and tighten the union nut.
15 Using a screwdriver, push the self-adjuster toothed quadrant fully towards the backplate to its initial setting.
16 Further refitting is a reversal of removal, but on completion apply the footbrake several times in order to set the brake shoes in their normal positions, and bleed the rear brake circuit.
P100 models
17 The procedure is as described in
paragraphs 1 to 16 inclusive, but with the
following differences.
18 Before removing the roadwheel, mark its position in relation to the brake drum.
Similarly, mark the position of the brake drum in relation to one of the wheel studs. Align the marks when refitting.
19 The wheel cylinder is secured to the brake backplate by a circlip instead of the two bolts used on other models (see illustration).
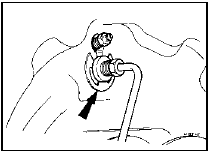
10.19 Wheel cylinder securing circlip (arrowed)
See also:
Bulbs (exterior lamps) - renewal
Headlamp
1 From within the engine compartment pull
the multi-plug from the rear of the headlamp.
2 Remove the rubber gaiter and rotate the
bulb securing clip or release the spring clip
arms accor ...
Hydraulic unit pressure switch (ABS) - removal and refitting
Note: To remove the pressure switch from the
hydraulic unit in situ, Ford tool No 12-008 or a
locally made equivalent will be required. The
switch may be removed without special tools
after removi ...
Engine - removal leaving manual gearbox in vehicle
Note: A suitable hoist and lifting tackle will be
required for this operation.
1.8 litre (R2A type)
1 Disconnect the battery negative lead.
2 Remove the bonnet.
3 Remove the air cleaner.
4 Disco ...
