Distributor components (CVH models) - removal and refitting
1 The distributor fitted to the CVH engine is unlike any conventional distributor, in that it has no main body and no adjustments are possible. The distributor is used purely to distribute HT voltage to the spark plugs. To remove the distributor components, proceed as follows.
2 Disconnect the battery negative lead.
Distributor cap
3 Pull the two halves of the distributor cap
shroud apart and remove the shroud.
Disconnect the earth strap from the tag on the timing cover (see illustration).
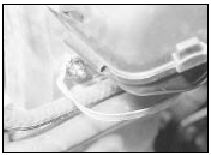
14.3 Distributor cap shroud earth strap connection
4 If necessary, identify each HT lead for position, so that the leads can be refitted to their correct cylinders, then disconnect the leads from the spark plugs by pulling on the connectors, not the leads. Unclip the HT lead holders from their studs on the camshaft cover (see illustration).
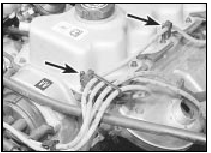
14.4 HT lead holders (arrowed) on camshaft cover
5 Depress the two securing screws and turn them anti-clockwise through 90º, then lift off the distributor cap.
6 Disconnect the HT lead from the coil by pulling on the connector not the lead, and remove the distributor cap.
7 Refitting is a reversal of removal, but ensure that the HT leads are fitted to their correct cylinders.
Rotor arm and housing
8 With the distributor cap removed as
described previously, compress the two lugs
on the rotor shaft and withdraw the rotor arm
(see illustration).
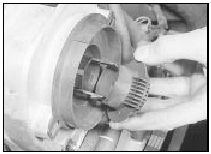
14.8 Removing the rotor arm
9 The rotor housing can now be removed by pulling it from the timing cover (see illustration).
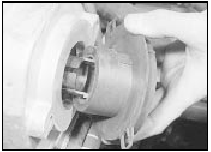
14.9 Removing the rotor housing
10 Refitting is a reversal of removal, but note that the rotor arm can only be fitted in one position.
Rotor shaft
11 The rotor shaft is retained by the camshaft
sprocket bolt.
12 To remove and refit the rotor shaft, first remove the timing cover and the camshaft sprocket bolt. Note that there is no need to remove the timing belt or the sprockets.
See also:
Engine/manual gearbox assembly - removal and separation
Note: A suitable hoist and lifting tackle will be
required for this operation.
1.8 litre (R2A type)
Removal
1 Proceed as described in Section 8,
paragraphs 1 to 15 inclusive.
2 Working inside th ...
Idle speed compensator - removal and refitting
Removal
1 The idle speed compensator is only fitted to
K-Jetronic systems from 1986 onwards and is
located in the centre of the engine
compartment bulkhead (see illustration).
19.1 K-Jetronic s ...
Engine oil and filter renewal (Every 6000 miles (10 000 km) or 6 months)
1 Frequent oil and filter changes are the most
important preventative maintenance
procedures which can be undertaken by the
DIY owner. As engine oil ages, it becomes
diluted and contaminated, whic ...
