Rear suspension front mounting (Saloon, Hatchback and Estate models) - renewal
1 Chock the front wheels, jack up the rear of the vehicle and support on axle stands placed under the side members.
2 Unscrew and remove the three bolts securing the relevant front guide plate to the underbody and the suspension crossmember.
Where applicable, bend back the lockwasher tab(s) on the larger bolt.
3 Using a length of wood, lever the suspension crossmember downwards a few inches from the underbody, and insert the wood as a wedge.
4 Using a tool similar to the Ford special tool shown (see illustration), or a long bolt with nut, washers and a suitable metal tube, pull the mounting rubber from the crossmember.
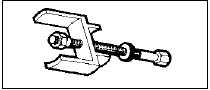
15.4 Ford special tool 15-014 for removing rear suspension front mounting
rubber
5 Lubricate the new mounting rubber with soapy water, and use the tool described in the previous paragraph to press the rubber into the crossmember.
6 Further refitting is a reversal of removal.
Where applicable, secure the larger front guide plate bolt by bending up the lockwasher tab(s).
See also:
Specifications
System type . . . . . . . . . . . . . . . . . . . . . . . . . .
. . . . . . . . . . . . . . . . . Pressurised, pump-assisted thermo-syphon with
front mounted
radiator and electric cooling fan
Pr ...
Ford VV carburettor manual choke unit - removal, checking and
refitting
Note: A new gasket will be required on
refitting.
Removal
1 Disconnect the battery negative lead.
2 Remove the air cleaner (Section 2).
3 Slacken the choke cable clamp bolt at the
choke lever, d ...
Specifications
General
Engine type . . . . . . . . . . . . . . . . . . . . . . . . . . . . . . . . . .
. . . . . . . . . . . . . Four-cylinder, in-line overhead valve
Capacity:
1.1 litre:
OHV engines . . . . . ...
