Tie-rod end - removal and refitting
Note: A balljoint separator tool will be required for this operation.
Removal
1 Loosen the relevant front roadwheel nuts,
apply the handbrake, jack up the front of the
vehicle and support on axle stands.
2 Remove the roadwheel. On P100 models mark the position of the roadwheel in relation to one of the wheel studs before removal.
3 Make alignment marks on the tie-rod and tie-rod end, then loosen the locknut by a quarter of a turn.
4 Extract the split pin and unscrew the castellated nut (see illustration).
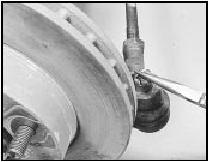
33.4 Extracting the split pin from the tierod balljoint castellated nut
5 Using a balljoint separator tool, release the tie-rod end from the hub carrier (see illustration).
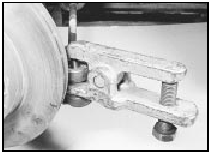
33.5 Using a balljoint separator tool to release the tie-rod end from the hub
carrier
6 Unscrew the tie-rod end from the tie-rod, noting the number of turns necessary to remove it.
Refitting
7 Refitting is a reversal of removal, bearing in
mind the following points.
8 Screw the tie-rod end onto the tie-rod the number of turns noted during removal.
9 Tighten the nuts to the specified torque, and fit a new split pin to the castellated nut.
10 On P100 models, align the previously made marks on the roadwheel and wheel stud.
11 On completion, check and if necessary adjust the front wheel alignment.
See also:
Anti-theft alarm - location, removal and refitting
Note: The alarm system has a self-diagnosis
function, which allows a Ford dealer to carry
out fault diagnosis, using suitable specialist
equipment. In the event of a problem with the
alarm system, ...
Minor body damage - repair
Repair of minor scratches in
bodywork
If the scratch is very superficial, and does not
penetrate to the metal of the bodywork, repair is
very simple. Lightly rub the area of the scratch
with a pa ...
Timing chain and sprockets - removal and refitting
Note: Refer to the warning at the beginning of
Section 5 before proceeding. A suitable puller
will be required to remove the crankshaft pulley.
A new crankshaft pulley bolt, a new timing chain
ten ...
