Door inner trim panel - removal and refitting
Front door
Models up to 1987
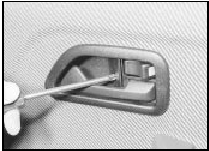
1 On models with manually-operated
windows, prise the cover from the window
regulator handle, note the position of the
handle with the window fully shut, then
remove the securing screw and withdraw the
handle and bezel (see illustrations).
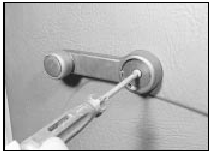
17.1a Prise the cover from the window handle, remove the securing screw . . .
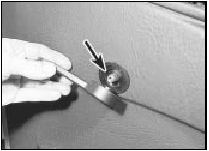
17.1b . . . then withdraw the window handle and bezel (arrowed)
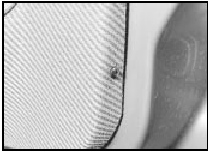
2 Remove the securing screw and withdraw the trim panel from behind the door grip (see illustration).
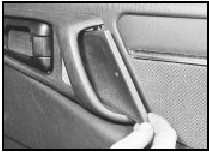
17.2 Withdraw the trim panel from behind the door grip
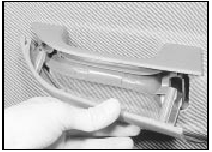
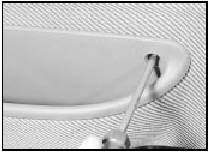
3 Remove the securing screw from the interior door handle surround, lift the handle, and withdraw the surround and grip (see illustrations).
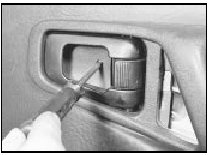
17.3a Remove the securing screw . . .
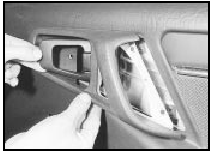
17.3b . . . and withdraw the handle surround and door grip
4 Remove the two securing screws and withdraw the door pocket (see illustration).
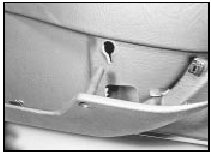
17.4 Withdraw the door pocket
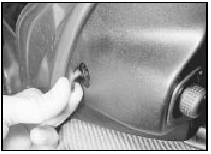
5 If working on the driver’s side of models fitted with electric mirrors, first disconnect the battery negative lead, then prise the mirror switch assembly from the door trim panel and disconnect the wiring plug.
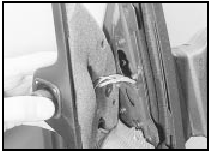
6 The trim panel can now be prised from the door. To prevent damage to the panel, only prise under the retaining clips (see illustration).
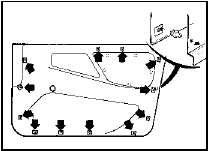
17.6a Door inner trim panel retaining clip locations (arrowed)
It is advisable to use a forked tool similar to that shown (see illustration)
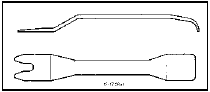
17.6b Trim panel retaining clip removal tool
to prise around the retaining clips, but failing this, use a wide-bladed screwdriver. If a clip will not release, sever it with a chisel or sharp knife, taking care not to damage the trim panel, and renew the clip on reassembly.
7 Refitting is a reversal of removal, but ensure that all the retaining clips are correctly aligned before pressing them into the door, and make sure that the upper lip of the trim panel locates under the mirror trim panel.
Models from 1987
8 Proceed as described in paragraph 1.
9 Remove the securing screw from the interior door handle surround, lift the handle, and withdraw the surround (see illustration).
17.9 Remove the interior door handle surround securing screws
10 Prise out the armrest trim panel, remove the three securing screws, and withdraw the armrest (see illustrations).
17.10a Prise out the armrest trim panel . . .
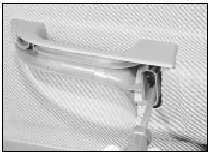
17.10b . . . and remove the armrest securing screws
11 On models with manually-operated mirrors, unscrew the bezel from the adjuster knob, then prise off the mirror trim panel.
12 When working on the driver’s side of models with electric mirrors, prise the securing screw cover from the mirror control panel, then remove the screw and withdraw the control panel. Disconnect the wiring plug after disconnecting the battery negative lead (see illustrations).
17.12a Prise the securing screw cover from the mirror control panel . . .
17.12b . . . and withdraw the mirror control panel
13 When working on the passenger side of models with electric mirrors, the mirror trim panel can simply be prised off.
14 Remove the now exposed door trim panel securing screw.
15 Remove the two trim panel securing screws from each side of the door, and the four securing screws from the door pocket, then lift the trim panel to disengage it from the top retaining clips, and withdraw the panel from the door (see illustrations).
17.15a Trim panel securing screw at bottom rear edge of door
17.15b Trim panel securing screw at top edge of door pocket
16 Refitting is a reversal of removal.
Rear door
Models up to 1987
17 Proceed as shown in paragraphs 1 to 3.
18 On models fitted with electric windows, disconnect the battery negative lead, then prise the switch from the armrest and disconnect the wiring plug.
19 Proceed as described in paragraph 6.
20 Refitting is a reversal of removal, but ensure that all the retaining clips are correctly aligned before pressing them into the door.
Models from 1987
21 Proceed as described in paragraph 1.
22 Remove the securing screw from the interior door handle, then pull out the ashtray, and remove the two now exposed screws.
23 Lift the interior door handle, and withdraw the handle/ashtray surround.
24 Prise out the armrest trim panel, remove the three securing screws and withdraw the armrest.
25 Remove the two trim panel securing screws from each side of the door, then lift the trim panel to disengage it from the top retaining clips, and withdraw the panel from the door.
26 Refitting is a reversal of removal.
See also:
Fuel injectors and injector delivery pipes - removal and
refitting
Note: Refer to the precautions at the end of
Section 1 before proceeding. It is important to
note that each injection supply pipe
connection in the distributor head has a screw
adjacent to it. The ...
Front foglamps - removal and refitting
1 Disconnect the battery negative lead.
Models up to 1987
2 Remove the relevant front direction
indicator lamp unit.
3 Release the retaining catch on the inside
edge of the lamp, then withdraw th ...
Front and rear brake pad/shoe check (Every 6000 miles (10 000 km) or 6
months)
1 Firmly apply the handbrake, then jack up
the front and rear of the car and support it
securely on axle stands (see “Jacking and
vehicle support”).
2 For a quick check, the front brake disc pads
...
