Alternator drivebelt check (Every 6000 miles or 6 months)
1 A conventional vee drivebelt is used to drive both the alternators and water pump pulleys on OHV and HCS engines, and the alternator pulley only on CVH engines, power being transmitted via a pulley on the engine crankshaft.
2 To remove the drivebelt, slacken the alternator mounting bolts and the bolts on the adjuster link and push the alternator in towards the engine as far as possible (see illustration).
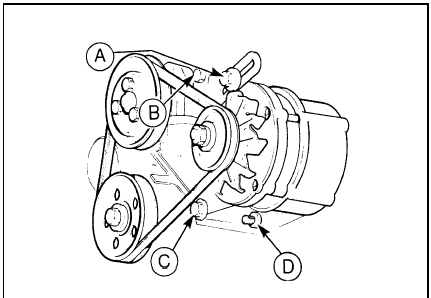
20.2 Alternator mounting and adjuster link bolts
A Adjuster link-to-alternator bolt B Adjuster link-to-engine bolt C and D Alternator mounting bolts
3 Withdraw the belt from the pulleys. In some instances it may also be necessary to remove the adjuster link-to-alternator bolt to avoid straining the drivebelt.
4 Fit the belt by slipping it over the pulley rims. If necessary remove the adjuster link-toalternator bolt, if not already done, to avoid straining the belt. Never be tempted to remove or refit the drivebelt by prising it over a pulley rim otherwise the pulley or the drivebelt internal webbing will be damaged.
5 To tension the belt pull the alternator away from the engine until the belt is fairly taut, and tighten the adjuster link-to-alternator bolt.
Check that the total deflection of the belt, using finger pressure at a point midway between the alternator and crankshaft or water pump pulleys, is 10 mm (0.4 in) (see illustrations). A little trial and error may be necessary to obtain the correct tension. If the belt is too slack, it will slip in the pulleys and soon become glazed or burnt. This is often indicated by a screeching noise as the engine is accelerated, particularly when the headlights or other electrical accessories are switched on. If the belt is too tight the bearings in the water pump and/or alternator will soon be damaged.
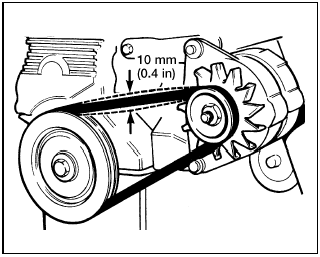
20.5a Drivebelt tension checking point - CVH engines
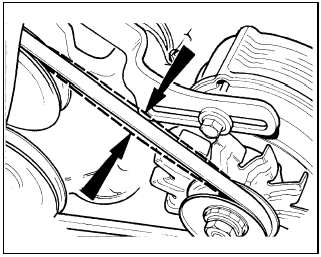
20.5b Drivebelt tension checking point - OHV engines
6 Once the tension is correct, tighten the remaining adjuster link bolt, front mounting bolt and rear mounting bolt in that order.
7 If a new belt has been fitted the tension should be rechecked and adjusted again if necessary after the engine has run for approximately ten minutes.
See also:
Introduction
General information
This Chapter is designed to help the home
mechanic maintain his/her vehicle for safety,
economy, long life and peak performance.
The Chapter contains a master
maintenance sche ...
Handbrake cable - removal and refitting
Removal
1 Chock the front wheels, loosen the rear
roadwheel nuts, then jack up the rear of the
vehicle and support on axle stands. Release
the handbrake and remove the roadwheels.
2 Slacken the h ...
Cooling, heating and ventilation systems
The cooling system is of the pressurised pump-assisted thermo-syphon
type. The system consists of the radiator, water pump, thermostat, electric
cooling fan, expansion tank and associated hoses. ...
