Timing belt - removal, refitting and adjustment
Removal
Note: From April 1988 (build code JG) a
modified timing belt tensioner incorporating a
larger diameter tensioner roller was
introduced, and from October 1988 an
improved timing belt was used. When renewal
of the timing belt becomes necessary, only the
latest, improved timing belt must be used (the
older type will no longer be available). On
models produced before April 1988 this will
also entail renewal of the tensioner roller.
1 Disconnect the battery negative lead.
2 Release the alternator mounting and adjuster link bolts, push the alternator in towards the engine and slip the drivebelt off the pulleys.
3 Using a spanner on the crankshaft pulley bolt, turn the crankshaft until the notch on the pulley is aligned with the TDC (0) mark on the timing belt cover scale. On models with a distributor, now remove the distributor cap and check that the rotor arm is pointing towards the No 1 cylinder HT lead segment in the cap. If the rotor arm is pointing towards the No 4 cylinder segment, turn the crankshaft through another complete turn and realign the pulley notch with the TDC mark. On EFI engine models (see Chapter 4, Part D), check that the timing mark on the camshaft sprocket is opposite the TDC mark on the cylinder head (see illustrations).
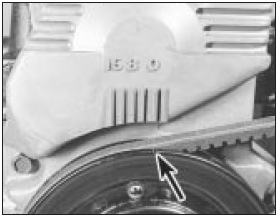
4.3a Crankshaft pulley notch (arrowed) aligned with TDC (0) mark on belt
cover scale

4.3b Camshaft sprocket at TDC position
4 On early models unscrew the four bolts and remove the one-piece timing belt cover. On later models fitted with a two-piece cover, unscrew the two upper bolts and remove the top half, then unscrew the two lower bolts.
The lower half cannot be removed at this stage (see illustrations).
4.4a Where a two-piece timing belt cover is fitted, undo the bolts . . .
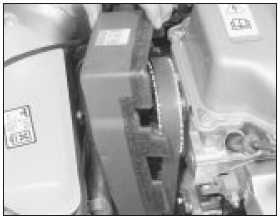
4.4b . . . and remove the upper half
5 Undo the bolts and remove the right-hand engine splash shield.
6 Using a ring spanner unscrew the crankshaft pulley retaining bolt. Remove the starter motor as described in Chapter 5, Part A and lock the flywheel ring gear with a cold chisel or similar tool to prevent the crankshaft rotating (see illustration). Remove the pulley, followed by the timing belt cover lower half on later models.
4.6 Using a stout bar to lock the flywheel ring gear
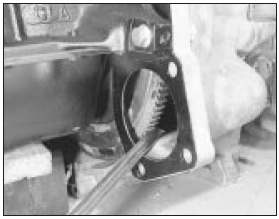
7 Slacken the two bolts which secure the timing belt tensioner and, using a large screwdriver, prise the tensioner to one side to relieve the tautness of the belt (see illustration). If the tensioner is spring-loaded, tighten one of the bolts to retain it in the slackened position.
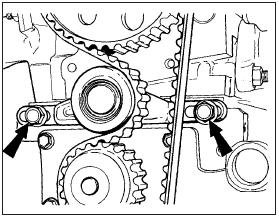
4.7 Timing belt tensioner retaining bolts (arrowed)
8 If the original belt is to be refitted, mark it for direction of travel and also the exact tooth positions on all three sprockets.
9 Slip the timing belt off the camshaft, water pump and crankshaft sprockets.
Refitting
10 Before refitting the belt, check that the
crankshaft is still at TDC (the small projection
on the belt sprocket front flange in line with
the TDC mark on the oil pump housing) and
that the timing mark on the camshaft sprocket
is opposite the TDC mark on the cylinder head
(see illustrations). Adjust the position of the
sprockets slightly, but avoid any excessive
movement of the sprockets while the belt is
off, as the piston crowns and valve heads may
make contact.
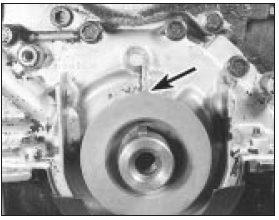
4.10a Crankshaft sprocket projection (arrowed) aligned with TDC mark on oil
pump housing
4.10b . . . and camshaft sprocket timing mark aligned with TDC mark on
cylinder head
11 Engage the timing belt with the teeth of the crankshaft sprocket and then pull the belt vertically upright on its right-hand run. Keep it taut and engage it with the teeth of the camshaft sprocket. Check that the positions of the sprockets have not altered (see illustration).
4.11 Place the timing belt in position
12 Wind the belt round the camshaft sprocket, around and under the tensioner and over the water pump sprocket.
13 Refit the crankshaft pulley and tighten the bolt, using the same procedure as used previously to stop the crankshaft turning. On later models make sure that the timing belt cover lower half is placed in position before refitting the pulley.
Adjustment
Note: Accurate adjustment of the timing belt
entails the use of Ford special tools. An
approximate setting can be achieved using the
method described in this Section, but the
tension should be checked by a dealer on
completion.
14 To adjust the belt tension, slacken the tensioner and move it towards the front of the car to apply an initial tension to the belt.
Secure the tensioner in this position.
15 Rotate the crankshaft clockwise through two complete revolutions, then return to the TDC position. Check that the camshaft sprocket is also at TDC as previously described.
16 Grasp the belt between thumb and forefinger at a point midway between the crankshaft and camshaft sprocket on the straight side of the belt. When the tension is correct it should just be possible to twist the belt through 90° at this point. Slacken the tensioner and using a large screwdriver as a lever, move it as necessary until the tension is correct. Tighten the tensioner bolts, rotate the camshaft to settle the belt, then recheck the tension. It will probably take two or three attempts to achieve success.
17 It must be emphasised that this is an approximate setting only and should be rechecked by a Ford dealer at the earliest opportunity.
18 Refit the starter motor, engine splash shield, distributor cap and timing belt cover/s.
19 Refit the alternator drivebelt and adjust its tension as described in Chapter 1.
20 Reconnect the battery.
See also:
Fuel injectors - removal and refitting
Caution: Refer to the
precautions in Section 1 before
proceeding.
Note: A tachometer and an exhaust gas
analyser will be required to check the idle
mixture on completion. New seals and
retaining ...
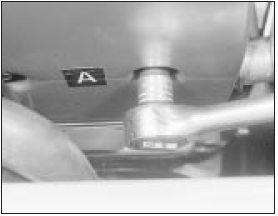
Opening rear quarter window - removal and refitting
Removal
1 Remove the rear pillar interior trim panel.
2 Remove the two screws securing the
window catch to the body (see illustration).
26.2 Opening the rear quarter window catch
A Cap
B Retai ...
Front and rear brake pad/shoe check (Every 6000 miles (10 000 km) or 6
months)
1 Firmly apply the handbrake, then jack up
the front and rear of the car and support it
securely on axle stands (see “Jacking and
vehicle support”).
2 For a quick check, the front brake disc pads
...
