Cylinder head - removal and refitting
Carburettor engines
Removal
Note: The cylinder head must only be
removed when the engine is cold. New
cylinder head bolts and a new gasket must be
used on refitting.
1 Disconnect the battery earth lead.
2 Remove the air cleaner (Chapter 4, Part A).
3 Drain the cooling system (Chapter 1).
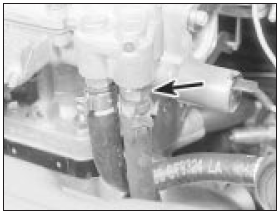
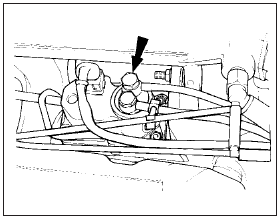
4 Disconnect the coolant hoses from the thermostat housing, automatic choke and inlet manifold as applicable (see illustration).
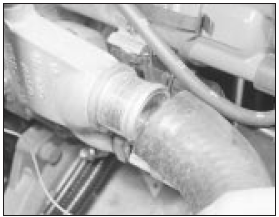
7.4 Disconnecting the hose from the thermostat housing - carburettor engine
5 Disconnect the throttle and where fitted the choke cable ends from the carburettor linkage, then undo the bolts and move the cable support bracket to one side (see illustration).
7.5 Disconnect the choke cable from the linkage clamp (arrowed) - carburettor
engine
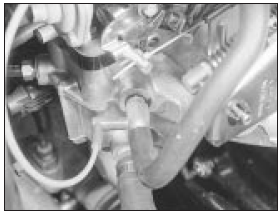
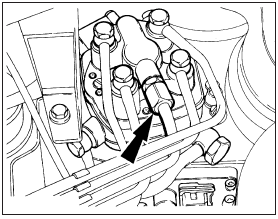
6 Disconnect the fuel pipe from the fuel pump (see illustration).
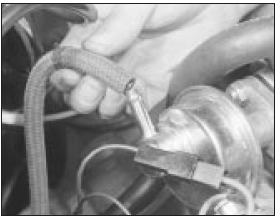
7.6 Disconnect the fuel feed pipe at the pump - carburettor engine
7 Disconnect the vacuum servo hose (where fitted) from the inlet manifold (see illustration).
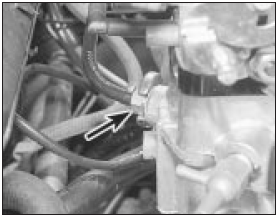
7.7 Disconnect the brake servo vacuum hose (arrowed) - 1.4 litre carburettor
engine
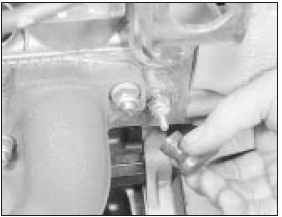
8 Where fitted, disconnect the fuel return pipe from the carburettor (see illustration).
7.8 Fuel return pipe location (arrowed) - 1.4 litre carburettor engine
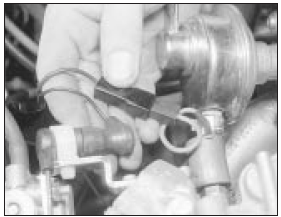
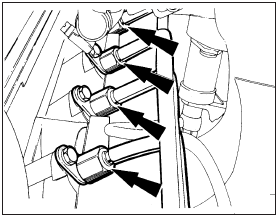
9 Disconnect the remaining vacuum hoses at the carburettor and inlet manifold, noting their locations (see illustration).
7.9 Vacuum hose attachments at the inlet manifold - 1.4 litre carburettor
engine
10 Disconnect the leads from the temperature sender unit, ignition coil, antirun- on valve solenoid and where applicable, carburettor electric choke and back bleed solenoid (see illustrations).
7.10a Disconnect the lead at the temperature sender . . .
7.10b . . . anti-run-on valve and back bleed solenoid (if fitted) - 1.4 litre
carburettor engine
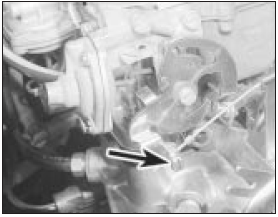
11 Unbolt the exhaust downpipe from the manifold by unscrewing the flange bolts. Support the exhaust pipe by tying it up with wire.
12 Release the alternator mounting and adjuster link bolts, push the alternator in towards the engine and slip the drivebelt from the pulleys.
13 Unbolt and remove the timing belt cover (upper cover only on later models).
14 Slacken the belt tensioner bolts, lever the tensioner to one side against the pressure of the coil spring (if fitted) and retighten the bolts.
15 With the timing belt now slack, slip it from the camshaft sprocket.
16 Disconnect the leads from the spark plugs and unscrew and remove the spark plugs.
17 Remove the rocker cover.
18 Unscrew the cylinder head bolts, progressively and in the sequence shown (see illustration). Discard the bolts, as new ones must be used at reassembly.
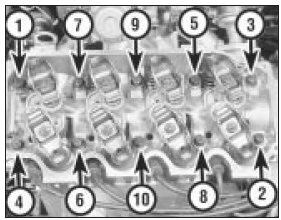
7.18 Cylinder head bolt removal sequence
19 Remove the cylinder head and manifolds.
Refitting
20 Before installing the cylinder head, make
sure that the mating surfaces of head and
block are perfectly clean with the head
locating dowels in position. Clean the bolt
holes free from oil. In extreme cases it is
possible for oil left in the holes to crack the
block due to hydraulic pressure.
21 Turn the crankshaft to position No 1 piston about 20 mm (0.8 in) before it reaches TDC.
22 Place a new gasket on the cylinder block and then locate the cylinder head on its dowels. The upper surface of the gasket is marked OBEN-TOP (see illustration).
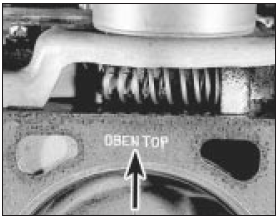
7.22 The upper surface of the cylinder head gasket is marked OBEN-TOP
(arrowed)
23 Install and tighten the new cylinder head bolts, tightening them in four stages (see Specifications). After the first two stages, the bolt heads should be marked with a spot of quick-drying paint so that the paint spots all face the same direction. Now tighten the bolts (Stage 3) through 90° (quarter turn) followed by a further 90° (Stage 4). Tighten the bolts at each stage only in the sequence shown before going on to the next stage. If all the bolts have been tightened equally, the paint spots should now all be pointing in the same direction (see illustrations).
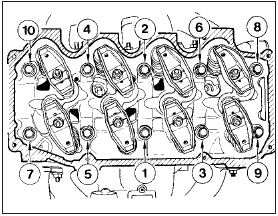
7.23a Cylinder head bolt tightening sequence
7.23b Tightening the cylinder head bolts
24 Fit the timing belt (Section 4).
25 Refitting and reconnection of all other components is a reversal of dismantling, with reference to the relevant Chapter.
26 Refill the cooling system (Chapter 1).
Fuel injection engines
Note: The cylinder head must only be
removed when the engine is cold. New
cylinder head bolts and a new gasket must be
used on refitting.
XR3i and Cabriolet models with
mechanical (Bosch K-Jetronic) fuel
injection
27 Disconnect the battery negative lead.
28 Disconnect the inlet air hose at the throttle housing.
29 Drain the cooling system (Chapter 1).
30 Disconnect the crankcase ventilation hoses from the inlet manifold and rocker cover.
31 Disconnect the coolant hoses from the thermostat housing, inlet manifold and inlet manifold intermediate flange.
32 Disconnect the throttle cable from the throttle housing.
33 Relieve the fuel system pressure by slowly loosening the fuel feed pipe union at the warm-up regulator (see illustration). Absorb fuel leakage in a cloth. Reference to the fuelinjection system layout in Chapter 4, Part B, or D, as applicable will assist in identification of the relevant components where necessary.
7.33 Fuel feed pipe union at the warm-up regulator - XR3i and Cabriolet
34 Disconnect the vacuum servo hose from the inlet manifold.
35 Disconnect the two fuel pipe unions at the warm-up regulator, the single pipe to the cold start valve and the four injector feed pipes at the fuel distributor (see illustration). Recover the sealing washers located on each side of the banjo unions and seal all disconnected pipes and orifices to prevent dirt ingress.

7.35 Injector pipe unions at the fuel distributor - XR3i and Cabriolet
36 Disconnect the vacuum hoses at the throttle housing after marking their locations to aid refitting.
37 Disconnect the wiring multi plugs at the cold start valve, warm-up regulator, and auxiliary air device, then disconnect the throttle valve stop earth cable (see illustration).
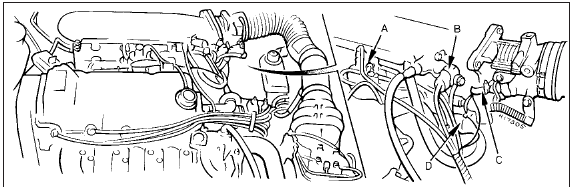
7.37 Wiring connections on the fuel-injection system - XR3i and Cabriolet
A Warm-up regulator
B Cold start valve
C Throttle valve stop earth cable
D Auxiliary air device
38 Disconnect the leads from the spark plugs and remove the distributor cap. Disconnect the distributor multi plug.
39 The remainder of the removal and the refitting sequence is the same as described for carburettor engines in paragraphs 11 to 26 inclusive.
1.4 CFI (Central Fuel Injection) and 1.6 EFI (Electronic Fuel Injection) engines 40 Disconnect the battery negative lead.
41 Disconnect all relevant hoses, pipes and wiring to facilitate cylinder head removal, with reference to the appropriate Sections of Chapters 4 and 5.
42 Disconnect the throttle cable as described in Chapter 4, Part C or Part D, as applicable.
43 The remainder of the removal and the refitting sequence is the same as described for carburettor engines in paragraphs 11 to 26 inclusive.
RS Turbo models
44 Disconnect the battery negative lead.
45 Drain the cooling system as described in Chapter 1.
46 Disconnect the inlet air hose and the connecting hose at the inlet air duct, then undo the two bolts and remove the air duct from the rocker cover. Disconnect the sensor multi plugs (see illustration).
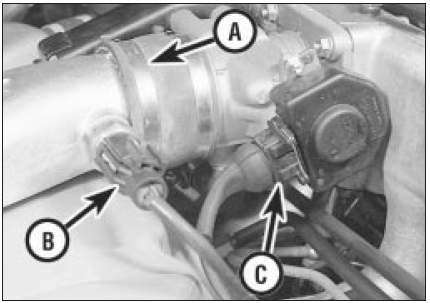
7.46 Air inlet duct connecting hose clip (A) charge air temperature sensor
multi-plug (B) and throttle position sensor multi-plug (C) on RS Turbo models
47 Disconnect the coolant hoses from the thermostat housing, inlet manifold and inlet manifold intermediate flange.
48 Disconnect the crankcase ventilation hose at the rocker cover and the two vacuum hoses from the inlet manifold. Release the hoses from their clips.
49 Disconnect the brake servo vacuum hose at the inlet manifold (see illustration).
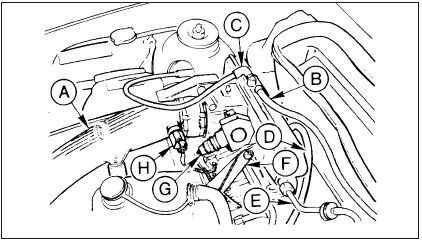
7.49 Wiring connections and hose attachments on the fuelinjection
system - RS Turbo
A Inlet air duct
B Vacuum hose
C Crankcase ventilation valve hose
D Auxiliary air device hose
E Vacuum servo hose
F Mounting bracket
G Throttle position sensor multiplug
H Charge air temperature sensor
multi-plug
50 Disconnect the throttle cable from the throttle housing.
51 Remove the turbocharger (Chapter 4, Part B).
52 Relieve the fuel system pressure by slowly loosening the cold start valve union on the top of the fuel distributor (see illustration).
Absorb fuel leakage in a cloth. Reference to the fuel-injection system layout in Chapter 4, Part B will assist in identification of the relevant components where necessary.
7.52 Cold start valve union on fuel distributor - RS Turbo
53 Disconnect the fuel pipes at the fuel injectors and at the cold start valve (see illustration). Recover the sealing washers located on each side of the banjo unions and seal all disconnected pipes and orifices to prevent dirt ingress. Move the fuel pipes clear of the cylinder head.
7.53 Fuel pipe connections at the fuel injectors - RS Turbo
54 Disconnect the wiring multi plugs at the temperature gauge sender unit, ignition coil, throttle position sensor, solenoid control valve, coolant temperature sensor, thermo-time switch, cold start valve and auxiliary air device.
55 Disconnect the leads from the spark plugs and remove the distributor cap.
56 The remainder of the removal and the refitting sequence is the same as described for carburettor engines in paragraphs 12 to 26 inclusive.
See also:
Waste gate solenoid control valve - removal and refitting
Removal
1 The solenoid control valve is mounted on a
bracket located underneath the ignition
distributor (see illustration).
21.1 Waste gate solenoid control valve location (arrowed)
2 Disconne ...
Handbrake - adjustment
1 Adjustment of the handbrake is normally
automatic by means of the self-adjusting
mechanism working on the rear brake shoes.
2 However, due to cable stretch, occasional
inspection of the handbrak ...
Cold start valve - removal and refitting
Note: Refer to the precautions at the end of
Section 1 before proceeding.
K-Jetronic system
Removal
1 Disconnect the battery earth lead.
2 Detach the electrical wiring multi-plug from
the valve ...
