Seat belts - removal and refitting
Front seat belt stalk 1 Remove the front seat.
2 Detach the seat belt stalk from the seat by removing the two Torx screws.
3 Refitting is a reversal of removal.
Front seat belt assembly 4 Where applicable, prise out the cover from the height adjuster using a small coin or similar implement, and detach the adjuster by removing the two screws (see illustration).
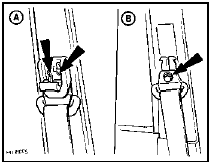
50.4 Front seat belt upper anchor fixings
A Adjuster securing screws B Anchor nut
5 Unscrew the seat belt upper anchor nut, noting the fitted positions of any washers and spacers so that they can be refitted in their original positions.
6 Remove the centre pillar trim panels.
7 On 3-door models, remove the waist-level seat belt webbing guide, and remove the bolt securing the belt slider bar to the body.
Disengage the slider bar from the heel kick panel, and slide off the belt webbing loop.
8 Unscrew the bolt securing the inertia reel unit to the centre pillar, noting the fitted positions of any washers and spacers so that they can be refitted in their original positions.
9 Refitting is a reversal of removal, taking care to install the belt without twists in the webbing, and refitting any washers and spacers in their original positions.
Rear seat belt assembly
Saloon models
10 Remove the rear seat cushion.
11 Unbolt the relevant belt anchor(s) from the floor (see illustration), noting the fitted positions of any washers and spacers so that they can be refitted in their original positions.
The central lap strap and buckle assemblies can be withdrawn after unbolting the anchors.
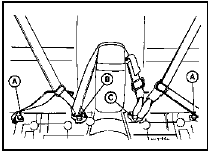
50.11 Rear seat belt lower anchors
A Inertia reel belt lower anchors B Static belt and buckle C Twin buckle assembly
12 To remove a side belt and inertia reel assembly, proceed as follows.
13 Remove the rear pillar trim panel.
14 Unscrew the upper belt anchor (see illustration), noting the fitted positions of any washers and spacers so that they can be refitted in their original positions.
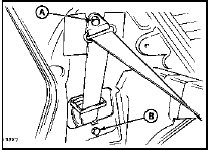
50.14 Rear seat belt upper anchor (A) and inertia reel securing bolt (B) -
Saloon models
15 Unscrew the bolt securing the inertia reel unit to the rear pillar, again noting the positions of any washers and spacers.
16 Refitting is a reversal of removal, taking care to install the belt(s) without twists in the webbing, and refitting any washers and spacers in their original positions.
Hatchback and Estate models 17 Remove the rear seat cushion.
18 Unbolt the relevant belt anchor(s) from the floor (see illustration), noting the fitted positions of any washers and spacers so that they can be refitted in their original positions.
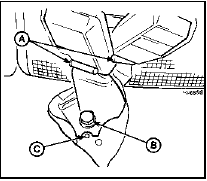
50.18 Rear seat belt twin buckle assembly lower anchor bracket - Hatchback
and Estate models
A Elasticated strap retaining dowels
B Anchor belt
C Floor dimple
19 To remove the central lapstrap and buckle assemblies, disconnect the buckle(s) from the elasticated straps by withdrawing the retaining dowel(s). To prevent the strap(s) from moving into the interior of the seat, insert a length of wire through the strap loop(s).
20 To remove a side belt and inertia reel assembly, proceed as follows.
21 Unbolt the upper left anchor, noting the position of any washers and spacers, and allow the webbing to pass into the inertia reel unit.
22 On Hatchback models, pull back the inertia reel cover in the luggage compartment, and unbolt the inertia reel from the body, noting the position of any washers and spacers. Prise out the belt guide from the rear parcel shelf support, and push the guide, upper and lower anchors, and buckle plate through the aperture.
23 On Estate models, remove the luggage compartment side trim panel then unbolt the inertia reel unit, noting the position of any washers and spacers, and withdraw the belt assembly.
24 Refitting is a reversal of removal, taking care to install the belt(s) without twists in the webbing, and refitting any washers and spacers in their original positions. Ensure that the cut-outs in the lower anchor brackets are correctly located around the raised dimples in the floor.
See also:
Choke control cable - removal, refitting and adjustment
Pre-1986 models
Removal
1 Disconnect the battery earth lead.
2 For improved access, remove the air
cleaner unit (Section 2).
3 At the carburettor end of the cable, loosen
the cable clamp bolt, d ...
Horn switch assembly - removal and refitting
1 Disconnect the battery negative lead.
Switch
Models up to 1987
2 Pull the trim insert from the centre of the
steering wheel, and disconnect the lead from
the horn push.
3 Disconnect the two le ...
Electrical system
The body electrical system consists of all lights, wash/wipe
equipment, interior electrical equipment, and associated switches and wiring. ...
