Oil pump - removal and refitting
Note: New oil pump and oil pick-up tube gaskets should be used when refitting.
Removal
1 With the engine removed, proceed as
follows.
2 Remove the timing belt, crankshaft sprocket and thrustwasher.
3 Remove the sump.
4 Unscrew and remove the nut securing the oil strainer/pick-up tube to No 4 main bearing cap (see illustration).
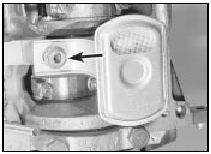
28.4 Oil strainer/pick-up tube securing nut (arrowed) on No 4 main bearing
cap
5 Using a suitable Allen key, unscrew the two bolts securing the oil pick-up tube to the oil pump, and withdraw the oil strainer/pick-up tube. Recover the washers and gasket (see illustration).
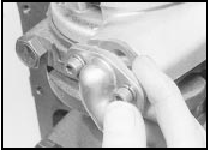
28.5 Removing the oil pick-up tube from the oil pump
6 Unscrew and remove the six securing bolts, and withdraw the oil pump over the front of the crankshaft. Recover the gasket.
Refitting
7 Commence refitting by prising the
crankshaft front oil seal from the pump
housing.
8 Prime the pump by injecting clean engine oil into it and turning it by hand.
9 Using a new gasket, fit the oil pump over the front of the crankshaft, ensuring that the central rotor engages with the flats on the crankshaft (see illustration).

28.9 Refitting the oil pump
Fit the securing
bolts, and using a straight-edge, ensure that
the bottom face of the oil pump is aligned with
the bottom face of the cylinder block before
finally tightening the bolts.
10 Using a new gasket, fit the oil pick-up tube to the oil pump and secure with the two bolts.
11 Refit the oil strainer/pick-up tube securing nut to No 4 main bearing cap.
12 Refit the sump.
13 Fit the crankshaft front oil seal using a suitable tool.
14 Refit the thrustwasher, crankshaft sprocket and timing belt.
See also:
Starter motor brushes - renewal
1 Starter motor brush renewal is a relatively
difficult procedure, requiring skill in the use of
a soldering iron. It should also be borne in
mind that if the starter motor has been in
service lon ...
Cold start valve - removal and refitting
Note: Refer to the precautions at the end of
Section 1 before proceeding.
K-Jetronic system
Removal
1 Disconnect the battery earth lead.
2 Detach the electrical wiring multi-plug from
the valve ...
Cigar lighter - removal and refitting
Removal
1 Disconnect the battery negative terminal.
2 On pre-1986 models remove the ashtray
then undo the screws and withdraw the
ashtray housing. On 1986 models onwards,
refer to Section 21 and ...
