Safety restraints for children
See the following sections for directions on how to properly use safety restraints for children. Also see Air bag supplemental restraint system (SRS) in this chapter for special instructions about using air bags.
Important child restraint precautions
You are required by law to use safety restraints for children in the U.S.
and Canada. If small children (generally children who are four years old or younger and who weigh 18 kg [40 lbs] or less) ride in your vehicle, you must put them in safety seats made especially for children. Check your local and state or provincial laws for specific requirements regarding the safety of children in your vehicle. When possible, always place children under age 12 in the rear seat of your vehicle. Accident statistics suggest that children are safer when properly restrained in the rear seating positions than in the front seating position.
Never let a passenger hold a child on his or her lap while the vehicle is moving. The passenger cannot protect the child from injury in a collision.
Always follow the instructions and warnings that come with any infant or child restraint you might use.
Children and safety belts
If the child is the proper size, restrain the child in a safety seat. Children who are too large for child safety seats (as specified by your child safety seat manufacturer) should always wear safety belts.
Follow all the important safety restraint and air bag precautions that apply to adult passengers in your vehicle.
If the shoulder belt portion of a combination lap and shoulder belt can be positioned so it does not cross or rest in front of the child's face or neck, the child should wear the lap and shoulder belt. Moving the child closer to the center of the vehicle may help provide a good shoulder belt fit.
Do not leave children, unreliable adults, or pets unattended in your vehicle.
Child booster seats
Children outgrow a typical convertible or toddler seat when they weigh 40 pounds and are around 4 years of age. Although the lap/shoulder belt will provide some protection, these children are still too small for lap/shoulder belts to fit properly, which could increase the risk of serious injury.
To improve the fit of both the lap and shoulder belt on children who have outgrown child safety seats, Ford Motor Company recommends use of a belt-positioning booster.
Booster seats position a child so that safety belts fit better. They lift the child up so that the lap belt rests low across the hips and the knees bend comfortably. Booster seats also make the shoulder belt fit better and more comfortably for growing children.
When children should use booster seats
Children need to use booster seats from the time they outgrow the toddler seat until they are big enough for the vehicle seat and lap/shoulder belt to fit properly. Generally this is when they weigh about 80 lbs (about 8 to 12 years old).
Booster seats should be used until you can answer YES to ALL of these questions:
- Can the child sit all the way back against the vehicle seat back with knees bent comfortably at the edge of the seat without slouching?
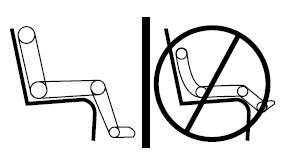
- Does the lap belt rest low across the hips?
- Is the shoulder belt centered on the shoulder and chest?
- Can the child stay seated like this for the whole trip?
Types of booster seats
There are two types of belt-positioning booster seats:
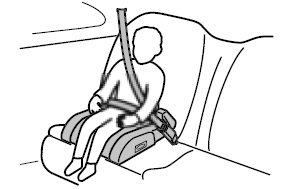
- Those that are backless.
If your backless booster seat has a removable shield, remove the shield and use the lap/shoulder belt. If a seating position has a low seat back and no head restraint, a backless booster seat may place your child's head (top of ear level) above the top of the seat. In this case, move the backless booster to another seating position with a higher seat back and lap/shoulder belts.
- Those with a high back.
If, with a backless booster seat, you cannot find a seating position that adequately supports your child's head, a high back booster seat would be a better choice.
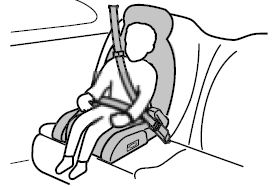
Both can be used in any vehicle in a seating position equipped with lap/shoulder belts if your child is over 40 lbs.
The shoulder belt should cross the chest, resting snugly on the center of the shoulder. The lap belt should rest low and snug across the hips, never up high across the stomach.
If the booster seat slides on the vehicle seat, placing a rubberized mesh sold as shelf or carpet liner under the booster seat may improve this condition.
The importance of shoulder belts
Using a booster without a shoulder belt increases the risk of a child's head hitting a hard surface in a collision. For this reason, you should never use a booster seat with a lap belt only. It is best to use a booster seat with lap/shoulder belts in the back seat- the safest place for children to ride.
Follow all instructions provided by the manufacturer of the booster seat.
Never put the shoulder belt under a child's armor behind the back because it eliminates the protection for the upper part of the body and may increase the risk of injury or death in a collision.
Never use pillows, books, or towels to boost a child. They can slide around and increase the likelihood of injury or death in a collision.
SAFETY SEATS FOR CHILDREN
Child and infant or child safety seats
Use a safety seat that is recommended for the size and weight of the child. Carefully follow all of the manufacturer's instructions with the safety seat you put in your vehicle. If you do not install and use the safety seat properly, the child may be injured in a sudden stop or collision.
When installing a child safety seat:
- Review and follow the information
presented in the Air bag
supplemental restraint system
(SRS) section in this chapter.
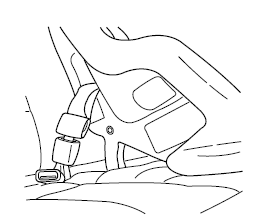
- Use the correct safety belt buckle for that seating position (the buckle closest to the direction the tongue is coming from).
- Insert the belt tongue into the proper buckle until you hear a snap and feel it latch. Make sure the tongue is securely fastened in the buckle.
- Keep the buckle release button pointing up and away from the safety seat, with the tongue between the child seat and the release button, to prevent accidental unbuckling.
- Place seat back in upright position.
- Put the safety belt in the automatic locking mode. Refer to Automatic locking mode (passenger side front and outboard rear seating positions) (if equipped) section in this chapter.
Ford recommends the use of a child safety seat having a top tether strap. Install the child safety seat in a seating position with a tether anchor. For more information on top tether straps, refer to Attaching child safety seats with tether straps in this chapter.
Carefully follow all of the manufacturer's instructions included with the safety seat you put in your vehicle. If you do not install and use the safety seat properly, the child may be injured in a sudden stop or collision.
Rear-facing child seats or infant carriers should never be placed in the front seats.
Installing child safety seats with combination lap and shoulder belts
Air bags can kill or injure a child in a child seat. NEVER place a rear-facing child seat in front of an active air bag. If you must use a forward-facing child seat in the front seat, move the seat all the way back.
Children 12 and under should be properly restrained in the rear seat whenever possible.
1. Position the child safety seat in a
seat with a combination lap and
shoulder belt. 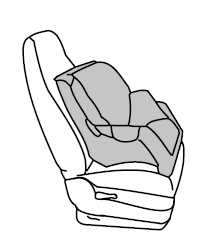
2. Pull down on the shoulder belt
and then grasp the shoulder belt
and lap belt together. 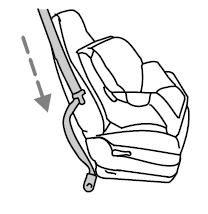
3. While holding the shoulder and
lap belt portions together, route the
tongue through the child seat
according to the child seat
manufacturer's instructions. Be sure
the belt webbing is not twisted. 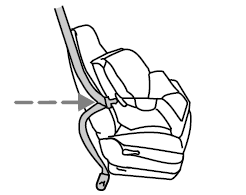
4. Insert the belt tongue into the
proper buckle (the buckle closest to
the direction the tongue is coming
from) for that seating position until
you hear a snap and feel the latch
engage. Make sure the tongue is
latched securely by pulling on it. 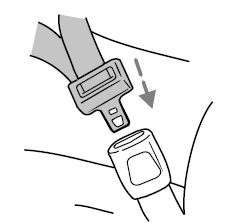
5. To put the retractor in the
automatic locking mode, grasp the
shoulder portion of the belt and pull
downward until all of the belt is
pulled out and a click is heard. 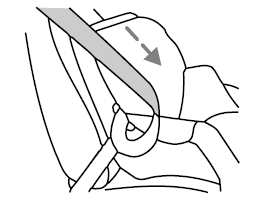
6. Allow the belt to retract. The belt will click as it retracts to indicate it is in the automatic locking mode.
7. Pull the lap belt portion across
the child seat toward the buckle and
pull up on the shoulder belt while
pushing down with your knee on the
child seat. 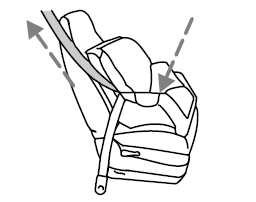
8. Allow the safety belt to retract to remove any slack in the belt.
9. Before placing the child in the
seat, forcibly move the seat forward
and back to make sure the seat is
securely held in place. To check
this, grab the seat at the belt path
and attempt to move it side to side
and forward. There should be no
more than one inch of movement for
proper installation. 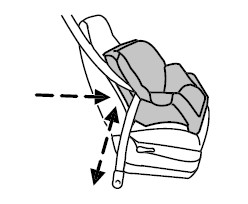
10. Try to pull the belt out of the retractor to make sure the retractor is in the automatic locking mode (you should not be able to pull more belt out). If the retractor is not locked, unbuckle the belt and repeat steps two through nine.
Check to make sure the child seat is properly secured before each use.
Attaching child safety seats with tether straps

Most new forward-facing child safety seats include a tether strap which goes over the back of the seat and hooks to an anchoring point. Tether straps are available as an accessory for many older safety seats. Contact the manufacturer of your child seat for information about ordering a tether strap.
The rear seats of your vehicle are equipped with built-in tether strap anchors located behind the seats as described below.
The tether anchors in your vehicle are located below the rear window marked with the tether anchor symbol (shown with title).
The tether strap anchors in your vehicle are in the following positions (shown from top view):
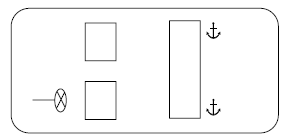
Attach the tether strap only to the appropriate tether anchor as shown. The tether strap may not work properly if attached somewhere other than the correct tether anchor.
1. Position the child safety seat on the seat cushion.
2. Route the child safety seat tether strap over the back of the seat.
For vehicles with adjustable head restraints, route the tether strap under the head restraint and between the head restraint posts, otherwise route the tether strap over the top of the seatback.
3. Locate the correct anchor for the selected seating position.
4. Clip the tether strap to the anchor as shown.
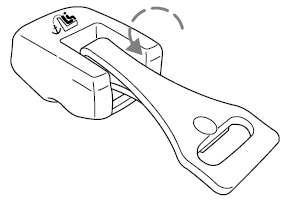
If the tether strap is clipped incorrectly, the child safety seat may not be retained properly in the event of a collision.
5. For further instructions to secure the child safety seat, refer to the Installing child safety seats in combination lap and shoulder belt seating positions section of this chapter.
6. Tighten the child safety seat tether strap according to the manufacturer's instructions.
If the safety seat is not anchored properly, the risk of a child being injured in a collision greatly increases.
Attaching safety seats with LATCH (Lower Anchors and Tethers for Children) attachments
Some child safety seats have two rigid or webbing mounted attachments that connect to two anchors at certain seating positions in your vehicle.
This type of child seat eliminates the need to use seat belts to attach the child seat. For forward-facing child seats, the tether strap must also be attached to the proper tether anchor. See Attaching safety seats with tether straps in this chapter.
Your vehicle has LATCH anchors for child seat installation at the seating positions marked with the child seat symbol.
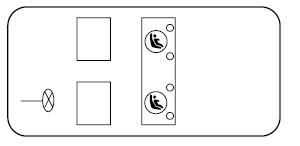
Never attach two LATCH child safety seats to the same anchor. In a crash, one anchor may not be strong enough to hold two child safety seat attachments and may break, causing serious injury or death.
The lower anchors for child seat installation are located at the rear section of the rear seat between the cushion and seat back.
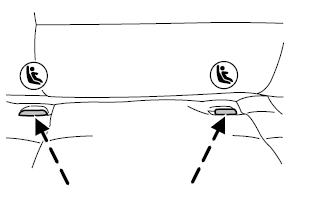
Follow the child seat manufacturer's instructions to properly install a child seat with LATCH attachments. Two plastic LATCH guides can be obtained at no charge from any Ford or Lincoln-Mercury dealer. They snap onto the LATCH lower anchors in the seat to help attach a child seat with rigid attachments. The guides hold the seat trim away to expose the anchor and make it easier to attach some child seats.
Attach LATCH lower attachments of the child seat only to the anchors shown.
If you install a child seat with rigid LATCH attachments, do not tighten the tether strap enough to lift the child seat off the vehicle seat cushion when the child is seated in it. Keep the tether strap just snug without lifting the front of the child seat. Keeping the child seat just touching the vehicle seat gives the best protection in a severe crash.
Each time you use the safety seat, check that the seat is properly attached to the lower anchors and tether anchor. Try to tilt the child seat from side to side. Also try to tug the seat forward. Check to see if the anchors hold the seat in place.
If the safety seat is not anchored properly, the risk of a child being injured in a crash greatly increases.
See also:
Front disc pads - renewal
Warning: Renew both sets of
front brake pads at the same time
- never renew the pads on only
one wheel, as uneven braking
may result. Note that the dust created by
wear of the pads may contain as ...
Radiator grille panel - removal and refitting
Models up to 1987
1 With the bonnet raised, remove the four
grille panel securing screws from the top of
the front panel.
2 Lift the grille panel from its lower mounting
bushes, and withdraw it f ...
Braking system
General information and precautions
General information
The braking system is of the dual circuit
hydraulic type. The front and rear circuits are
operated independently from a tandem
master cylin ...
