Expansion tank and coolant level sensor - removal and refitting
Removal
1 With the engine cold, slowly unscrew the
expansion tank cap to release any remaining
pressure from the cooling system. Remove
the cap.
2 Place a suitable container beneath the expansion tank.
3 Disconnect and plug the upper hose.
4 Where applicable, disconnect the coolant level sensor wiring plug.
5 Unscrew the expansion tank securing screws, and tilt the tank so that the coolant runs to the sealed end.
6 Disconnect and plug the lower hose.
7 Drain the expansion tank into the container and remove the tank.
8 Where applicable, the coolant level sensor can be removed from the tank by unscrewing the collar from the sensor, then withdrawing the spacer, sensor and seal (see illustration).
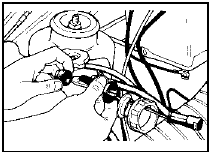
15.8a Removing the coolant level sensor from the expansion tank
Renew the seal if necessary. Note that the sensor can only be fitted in one position (see illustration).
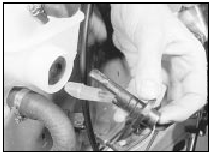
15.8b Fitting the coolant level sensor
Refitting
9 Refitting is a reversal of removal.
10 On completion, top-up the coolant level to the maximum mark, then refit the expansion tank cap and run the engine at a fast idling speed for several minutes. Check the expansion tank for leaks, then stop the engine and if necessary top-up the coolant level.
See also:
Fuel injector - removal and refitting
Note: Refer to the precautions at the end of
Section 1 before proceeding. New injector
seals will be required on refitting.
Removal
1 Disconnect the battery negative lead.
2 Remove the air cleane ...
Cylinder block and bores - examination and renovation
1 The cylinder bores must be examined for
taper, ovality, scoring and scratches. Start by
examining the top of the bores; if these are
worn, a slight ridge will be found which marks
the top of the ...
Pistons and connecting rods - examination and renovation
1.8 litre (R2A type)
1 Examine the pistons for ovality, scoring,
and scratches. Check the connecting rods for
wear or damage.
2 The gudgeon pins are an interference fit in
the connecting rods, an ...
