Bulbs (exterior lamps) - renewal
Headlamp 1 From within the engine compartment pull the multi-plug from the rear of the headlamp.
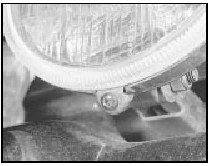
2 Remove the rubber gaiter and rotate the bulb securing clip or release the spring clip arms according to type (see illustration).
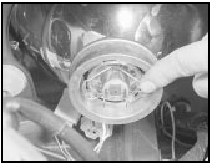
5.2 Releasing headlamp bulb spring clip arms
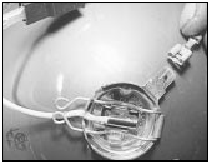
3 Withdraw the bulb, taking care not to touch the glass with your fingers (see illustration). If the glass is touched, wipe the bulb with a rag moistened with methylated spirit.
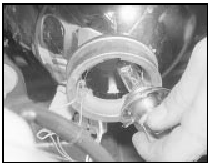
5.3 Headlamp bulb removal
4 Fit the new bulb using a reversal of the removal procedure, taking care not to touch the glass.
Front sidelamp
5 The bulbholder is located on the side of the
headlamp unit and is removed by twisting it
anti-clockwise (see illustration).
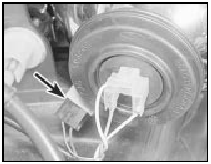
5.5 Sidelamp bulb location (arrowed) in side of headlamp
6 Withdraw the push-fit bulb from the holder.
7 Fit the new bulb using a reversal of the removal procedure.
Front direction indicator lamp 8 Working through the aperture in the inner wing panel in the engine compartment, turn the bulbholder anti-clockwise and withdraw it from the lens unit (see illustration).
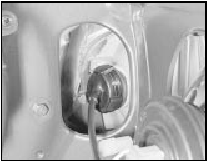
5.8 Front indicator bulbholder accessible through inner wing panel aperture
9 Depress and turn the bulb anti-clockwise to remove it from the holder.
10 Fit the new bulb using a reversal of the removal procedure.
Front direction indicator side
repeater lamp
11 Reach up behind the front wheelarch and
locate the back of the repeater lamp holder.
12 Depress the two clips on the holder body and push the assembly outwards and out of the wing.
13 Twist the bulbholder anti-clockwise to free it from the lens.
14 Pull the bulb from its socket.
15 Push in a new bulb and refit the assembly in the reverse order to removal.
Front auxiliary lamp and foglamp 16 Undo the retaining screw at the bottom of the lens and withdraw the lens assembly (see illustration).
5.16 Front auxiliary lamp lens retaining screw
17 Disconnect the earth lead and remove the lens (see illustration).
5.17 Disconnecting auxiliary lamp earth lead
18 Spring back the clip legs and remove the bulbholder, then withdraw the bulb (see illustration). Avoid touching the bulb glass with your fingers. If the glass is touched, wipe it with a cloth moistened in methylated spirit.

5.18 Removing the auxiliary lamp bulbholder
19 Fit the new bulb using a reversal of the removal procedure, taking care not to touch the glass.
Rear lamps - Saloon
20 Open the tailgate, reach down and
depress the retaining tab on the side of the
bulbholder. Swing the bulbholder outward to
release the locating tag at the other end (see
illustration).

5.20 Removing the rear lamp bulbholder for access to the bulbs
21 Remove the relevant bulb by pushing down and turning anti-clockwise.
22 Fit the new bulb using a reversal of the removal procedure.
Rear lamp - Cabriolet
23 Open the boot and pull the bulb cover open.
24 Push the upper and lower retaining tabs apart and withdraw the bulbholder.
25 Remove the relevant bulb by pushing down and turning anti-clockwise.
26 Fit the new bulb using a reversal of the removal procedure.
Rear lamps - Estate
27 Open the tailgate and release the side trim
panel by turning the four screws a quarter of a
turn with a coin.
28 Push the upper and lower retaining tabs apart and withdraw the bulbholder.
29 Remove the relevant bulb by pushing down and turning anti-clockwise.
30 Fit the new bulb using a reversal of the removal procedure.
Rear lamp - Van
31 Open the rear doors and remove the rear
trim panel to gain access to the bulbholders
(where applicable).
32 Remove the individual bulbholders by turning anti-clockwise, then similarly remove the bulbs from the holders.
33 Fit the new bulb using a reversal of the removal procedure.
Rear number plate lamp
34 Using a small screwdriver carefully prise
the lamp out of the bumper.
35 On pre-1986 models turn the bulbholder anti-clockwise and remove it from the lens.
Withdraw the push-fit bulb (see illustration).
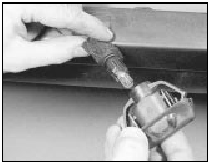
5.35 Removing the number plate lamp bulbholder from the lens
36 On 1986 models onwards spread the retaining clips and withdraw the bulbholder.
Remove the bulb by pushing and turning anticlockwise.
37 Fit the new bulb using a reversal of the removal procedure.
See also:
Minor body damage - repair
Repair of minor scratches in
bodywork
If the scratch is very superficial, and does not
penetrate to the metal of the bodywork, repair is
very simple. Lightly rub the area of the scratch
with a pa ...
Front suspension strut - removal, overhaul and refitting
Removal
1 Slacken the roadwheel bolts, raise the front
of the vehicle and support it securely on
stands (see “Jacking and Vehicle Support”),
then remove the roadwheel.
2 Support the underside of ...
Engine/automatic transmission assembly - removal and separation
Note: A suitable hoist and lifting tackle will be
required for this operation. Any suspected
faults in the automatic transmission should be
referred to a Ford dealer or automatic
transmission spec ...
