Front suspension strut - removal, overhaul and refitting
Removal
1 Slacken the roadwheel bolts, raise the front
of the vehicle and support it securely on
stands (see “Jacking and Vehicle Support”),
then remove the roadwheel.
2 Support the underside of the driveshaft on blocks or by tying it up to the rack-and-pinion steering housing.
3 Where fitted, detach the brake hose and location grommet from the strut location bracket, then unscrew and remove the pinchbolt which holds the base of the suspension strut to the hub carrier (see illustration).
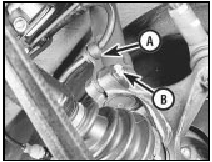
7.3 Brake hose and grommet location in strut (A) and strut-to-hub carrier
pinch-bolt (B)
Using a suitable tool, lever the sides of the slot in the carrier apart until it is free from the strut.
4 On pre-May 1983 models undo the two bolts securing the strut to the inner wing turret. On post-May 1983 models lift off the cover then unscrew the strut retaining nut.
Prevent the piston rod from turning using a 6 mm Allen key (see illustrations).

7.4a Suspension strut-to-turret mounting bolts on pre-1983 models
7.4b Removing the nut cover . . .
7.4c . . . and strut retaining nut on post- 1983 models
Note Allen key to prevent piston rod turning
5 Withdraw the complete strut assembly from under the front wing.
Overhaul
Note: Spring compressor tools will be
required for this operation.
6 Clean away external dirt and mud.
7 If the strut has been removed due to oil leakage or to lack of damping, then it should be renewed with a new or factory reconditioned unit. Dismantling of the original strut is not recommended and internal components are not generally available.
8 Before the strut is exchanged, the coil spring will have to be removed. To do this, a spring compressor or compressors will be needed. These are generally available from tool hire centres or they can be purchased at most motor accessory shops.
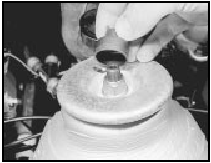
9 Engage the compressor over four coils of the spring and compress the spring sufficiently to release spring tension from the top mounting (see illustration).
7.9 Coil spring retained with spring compressors
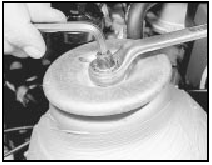
10 Once the spring is compressed, unscrew and remove the nut from the end of the piston rod which retains the top mounting. As there will be a tendency for the piston rod to turn while the nut is unscrewed, insert a 6 mm Allen key to hold the rod still.
11 Remove the top mounting and lift off the spring and compressor.
12 The compressor need not be released if the spring is to be fitted immediately to a new strut. If the compressor is to be released from the spring, make sure that you do it slowly and progressively.
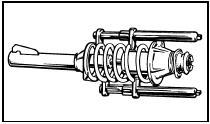
13 The top mounting can be dismantled by sliding off the thrust bearing and withdrawing the spring upper seat, gaiter spring and, where fitted, insulator. Also, if fitted, slide the bump stop from the piston rod (see illustration).
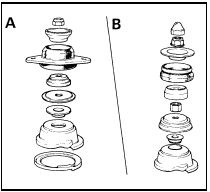
7.13 Exploded view of the suspension strut upper mounting components
A Pre-May 1983 models B Post-May 1983 models
14 Renew any worn or damaged components. If the front strut and/or coil spring is to be removed then it is advisable also to renew the equivalent assembly on the other side.
15 Fit the spring to the strut, making sure that the ends of the coils locate correctly in the shaped parts of the spring seats.
16 Fit the top mounting components, being very careful to maintain the correct order of assembly of the individual components.
17 Gently release and remove the spring compressor. Check that the ends of the spring are correctly located in the shaped sections of the spring seatings.
Refitting
18 Refit the strut using the reverse of the
removal procedure. Lower the vehicle so that
it is standing on its roadwheels before
tightening the top mounting bolts or nut to the
specified torque.
See also:
Engine/manual gearbox assembly - removal and separation
Note: Refer to the warning in Section 8 before
proceeding. A suitable hoist and lifting tackle
will be required for this operation.
Removal
1 Proceed as described in Section 9,
paragraphs 1 to 17 ...
Engine/manual gearbox assembly - reconnection and refitting
1 Reverse the procedure described in Section
11, noting the following points.
2 Before attempting to reconnect the engine
to the gearbox, check that the clutch friction
disc is centralised. This i ...
Engine oil and filter renewal (Every 6000 miles or 6 months)
1 Frequent oil and filter changes are the most
important preventative maintenance
procedures that can be undertaken by the DIY
owner. As engine oil ages, it becomes diluted
and contaminated, which ...
