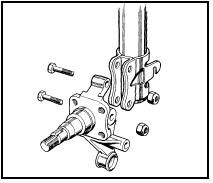
Rear stub axle carrier Saloon and Estate models) - removal and refitting
Removal
1 Raise and support the rear of the car on
stands (see “Jacking and Vehicle Support”).
Remove the roadwheel.
2 Remove the rear hub as described in Section 9.
3 Remove the rear brake shoe assembly, as described in Chapter 9. You will also need to disconnect the brake fluid pipe at its connection to the wheel cylinder. Plug the pipe and cylinder connections to prevent fluid loss and the ingress of dirt.
4 Extract the handbrake cable through the backplate, then unscrew the four backplate retaining bolts and withdraw the backplate.
5 Position a jack under the lower arm and support it.
6 Undo the two nuts and remove the bolts securing the shock absorber to the stub axle carrier (see illustration).

16.6 Rear stub axle and shock absorber attachment - Saloon and Estate models
7 Undo the nut and remove the lower arm outboard pivot through-bolt.
8 Accurately record the location and number of washers at the tie-bar attachment then undo the nut and withdraw the stub axle carrier.
Refitting
9 If the stub axle is damaged or worn
excessively then it must be renewed.
10 Refitting is a reversal of the removal procedure, but note the following: a) When reassembling the tie-bar to the stub axle ensure that the spacers, washers and bushes are correctly located (as noted during removal).
b) Do not fully tighten the suspension retaining nuts and bolts to their specified torque settings until the vehicle is lowered and standing on its roadwheels.
c) Refit and connect the brake assembly components, as given in Chapter 9. Leave bleeding the hydraulic circuit until after the hub and brake drum are refitted.
d) Adjust the hub bearings, as detailed in Section 8.
See also:
Boot lid (Saloon models) - removal and refitting
Removal
1 Open the boot lid, and place protective
covers (old rags or cardboard) beneath the
corners of the lid, and over the rear wings to
prevent damage to the paintwork.
2 Where applicable, di ...
Headlining - removal and refitting
Saloon, Hatchback and Estate
models
1 On Saloons, remove the rear seat back.
2 Loosen the upper screws of all the pillar
trim panels touching the headlining.
3 Prise off the covers and remove the ...
Sunroof components - removal, refitting and adjustment
Sunroof panel
Removal
1 To remove this type of glass panel, pull the
sun blind into the open position and have the
sliding roof closed.
2 Wind the sliding roof handle in an anticlockwise
directi ...
