Steering gear bellows - renewal
1 At the first indication of a split or grease leakage from the bellows, renew them.
2 Loosen off the roadwheel bolts, raise the front of the vehicle and support it on stands (see “Jacking and Vehicle Support”). Remove the roadwheels.
3 Measure and take note of the amount of thread on the tie-rod which is exposed (see illustration). This will ensure correct toesetting on reassembly.
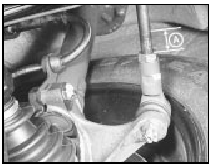
20.3 Steering tie-rod outer balljoint showing exposed threads (A) on tie-rod
4 Loosen off the tie-rod outer ball-joint locknut.
5 Extract the split pin and remove the nut from the balljoint taper pin.
6 Using a suitable balljoint extractor, separate the balljoint taper pin from the eye of the steering arm (see illustration).
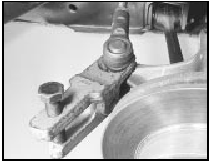
20.6 Releasing tie-rod balljoint using separator tool
7 Unscrew the balljoint from the end of the tie-rod, also the locknut. As a double check for correct repositioning of the tie-rod balljoint when reassembling, note the number of turns required to remove it.
8 Release the clip from the end of the damaged bellow and slide it from the rack and the tie-rod (see illustration).
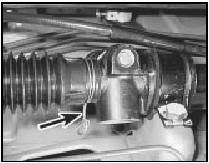
20.8 Bellows-to-rack and pinion housing wire type retaining clip (arrowed)
9 When ordering the new bellows and retaining clips also specify the diameter of the tie-rod which will vary according to manufacture and can be checked with a ruler or calipers. This is important since if the wrong size bellows are fitted they will not seal or possibly be damaged on fitting.
10 If a damaged bellow has caused steering lubricant loss it will be necessary to drain any remaining lubricant and renew it. To do this turn the steering wheel gently to expel as much lubricant as possible from the rack housing. If the opposing bellow is not being renewed it is recommended that it is released from the rack housing to allow the old lubricant to be removed from that end, too.
11 Smear the narrow neck of the new bellows with grease and slide into position over the tie-rod, ensuring that the bellows are correctly located in the tie-rod groove on the outer bellow end (where applicable) (see illustration).
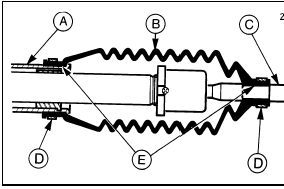
20.11 Steering gear bellows fitting details
A Rack housing
B Bellows
C Steering tie-rod
D Retaining clips
E Apply a smear of grease
when fitting
12 If new bellows are being fitted to the
pinion
end of the rack, leave the bellows unclamped
at this stage.
13 If the bellows are being fitted to the rack support bush end of the rack housing, clamp the inner end of the bellows.
14 Always use new screw-type clamps, never re-use the old factory-fitted wire type when securing the bellows.
15 Screw the locknut into position on the tierod, followed by the outer tie-rod balljoint.
Screw the joint the exact number of turns noted during removal.
16 Connect the balljoint to the steering arm, tighten the nut to the specified torque and insert a new split pin to secure.
17 If applicable, add the correct quantity of the specified lubricant to the end of the steering rack (insert the grease into the bellows), then move the rack from lock-tolock to assist the entry of the lubricant into the steering gear.
18 Where applicable, ensure that the fresh lubricant has worked its way into the steering gear, then tighten the bellow retaining clamp(s).
19 Refit the roadwheels and lower the vehicle to the ground. Settle the suspension by bouncing the front end.
20 Tighten the balljoint locknut and check the amount of tie-rod thread exposed. It should be as noted when dismantling and therefore provide the correct toe-setting, but in any case the alignment should really be checked at the earliest opportunity, as described in Section 27 or by your Ford dealer.
See also:
Mixture (CO) adjustment potentiometer - removal and refitting
Removal
1 The potentiometer is located on the side of
the left-hand suspension turret (see
illustration).
17.1 Mixture (CO) adjustment potentiometer (arrowed) - 1.6 EFI engine
2 Disconnect the ...
Spark plug renewal - RS Turbo models (Every 6000 miles or 6
months)
1 The correct functioning of the spark plugs is
vital for the correct running and efficiency of
the engine. It is essential that the plugs fitted
are appropriate for the engine, and the
suitable t ...
Rear shock absorber (Saloon and Estate models) - removal,
testing and refitting
Removal
1 Slacken the roadwheel bolts, raise the rear
of the vehicle, support it on stands (see
“Jacking and Vehicle Support”) and remove
the roadwheel.
2 Support the suspension lower arm with a
...
