Central door locking system components - removal and refitting
General
1 On pre-1986 models the locks, with the
exception of the one on the driver’s door, are
actuated by solenoids (see illustration).

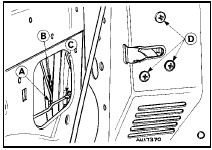
18.1 Layout of the solenoid operated central door locking system as fitted to
pre- 1986 models
A Front door components B Rear door components C Tailgate components
On 1986 models onwards, the locks are actuated by electric motors.
Switch (driver’s door lock)
Removal
2 Raise the driver’s door lock fully.
3 Disconnect the battery.
4 Remove the door trim panel (Section 11).
5 Disconnect the wiring plugs inside the door cavity and release the wires from their clips.
6 Release the lock control rods and remove the lock fixing screws.
7 Remove the lock from the door interior by guiding it round the glass guide channel.
8 Extract the two screws and remove the switch from the lock.
Refitting
9 Refitting is a reversal of removal, but before
refitting the door trim panel check that the
wires within the door cavity are out of the way
of the window regulating mechanism and
secured by strap clips.
Control relay
Removal
10 Disconnect the battery.
11 Remove the under-facia trim panel from the passenger side.
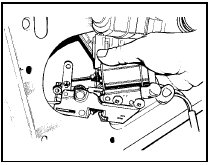
12 Pull the relay from its securing clips (see illustration).

18.12 Central locking solenoid relay location behind glovebox - pre-1986
models
13 Disconnect the multi-plug and remove the relay.
Refitting
14 Refitting is a reversal of removal.
Solenoids - pre-1986 models
Front door
Removal
15 Disconnect the battery.
16 Remove the door trim panel as described in Section 11.
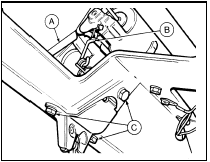
17 Disconnect the lock operating rods and extract the three lock fixing screws (see illustration).
18.17 Door locking rod attachments - pre- 1986 models
A, B and C Control rods D Lock retaining screws
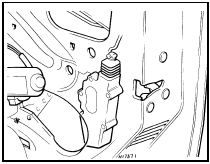
18 Release the wiring from the clips, manoeuvre the lock round the door glass guide channel and remove it through the cutout in the door panel (see illustration).
18.18 Door lock solenoid removal - pre-1986 models
19 Separate the solenoid from the lock after extracting the fixing screws.
Refitting
20 Refitting is a reversal of removal, bearing
in mind the following points.
a) When fitting the door lock solenoids, locate the guide lock assembly into position, but do not fully tighten the retaining screws until after the bellcrank and rubber operating rod guides, and the internal lock operating lever are fitted.
b) Check that, when the solenoid is in the unlocked position, the gaiter has an uncompressed length of 20 mm (0.78 in).
c) Before refitting the door trim panel check that the wires within the door cavity are out of the way of the window regulating mechanism and secured by strap clips.
Rear door
Removal
21 Disconnect the battery.
22 Remove the door trim panel as described in Section 11.
23 Remove the bellcrank and operating lever by extracting the securing screws.
24 Release the operating rod rubber insulators from the door and disconnect the wiring.
25 Extract the lock securing screws, push the lock into the door cavity and then withdraw the lock with the operating rods through the cut-out in the door panel.
26 Extract the screws and disconnect the solenoid from the lock.
Refitting
27 Refer to paragraph 20.
Tailgate
Removal
28 Disconnect the battery.
29 Open the tailgate and remove the trim panel (see Section 32).
30 Remove the lock rod clip and then prise out the clip which retains the lock cylinder.
Remove the cylinder.
31 Slightly lower the tailgate and working through the lock cylinder hole, move the lock lever away from its spring until the lock engages.
32 Disconnect the solenoid wiring.
33 Extract the lock fixing bolts and remove the lock (see illustration).
18.33 Tailgate lock and solenoid components - pre-1986 models
A Lock barrel clip
B Lock rod clip
C Lock fixing bolts
34 Insert a screwdriver through the aperture left by removal of the lock and unscrew the two solenoid fixing screws. Withdraw the solenoid.
Refitting
35 Refitting is a reversal of removal.
Boot lid (Cabriolet)
Removal
36 Disconnect the battery.
37 Remove the boot lid lock unit, as described in Section 16, and disconnect the solenoid wiring.
38 Unscrew and remove the two solenoid retaining screws, unhook the operating shaft and withdraw the solenoid.
Refitting
39 Refitting is a reversal of removal.
Motors - 1986 models onwards
Front and rear doors
Removal
40 Disconnect the battery.
41 Remove the door trim panel (Section 11).
42 Undo the two retaining screws, or drill out the bracket rivets, and withdraw the motor (see illustration).
18.42 Door lock motor location - 1986 models onwards
43 Disconnect the motor from the operating rod, disconnect the wiring multi-plug and remove the motor.
Refitting
44 Refitting is a reversal of removal.
Tailgate and boot lid
Removal
45 Disconnect the battery.
46 Open the tailgate or boot lid and remove the trim panel where applicable (see Section 32).
47 Disconnect the motor wiring multi-plug.
48 Undo the motor retaining bolts, disconnect the operating rod and remove the motor.
Refitting
49 Refitting is a reversal of removal.
See also:
Internal connection details, all models continued
Internal connection details, all models continued ...
Airflow meter - removal and refitting
Note: A tachometer and an exhaust gas
analyser will be required to check the idle
mixture on completion.
1 Disconnect the battery negative lead.
2 Depress the locking clip on the airflow
meter wi ...
Engine dismantling, examination, renovation and reassembly - general
information
1.8 litre (R2A type)
Dismantling
1 It is best to mount the engine on a
dismantling stand, but if this is not available,
stand the engine on a strong bench at a
comfortable working height. Failing ...
