Body exterior fittings - removal and refitting
Spoilers and wheel arch
deflectors
Removal
1 The spoilers and wheel arch deflectors
fitted to XR3, XR3i, Cabriolet and RS Turbo
models are secured by screws, rivets and
clips, or a combination of all three.
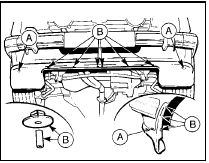
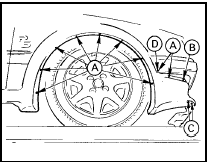
2 The screw and rivet fasteners are concealed under blanking plugs which are prised out to gain access to the screw or rivet as applicable (see illustrations). These can then be drilled out or unscrewed and the spoiler or wheel arch deflector withdrawn.

25.2a Front spoiler attachments - XR3 models
A Retaining screws B Retaining pegs

25.2b Front wheel arch extension attachments - RS Turbo models
A and B Rivets
C Screws
D Screw cap
Refitting 3 Refitting is a reversal of removal.
Body adhesive emblems and
mouldings
Removal
4 The radiator grille emblem, the front wing
motif, the tailgate emblems and the body side
mouldings are all of the self-adhesive type.
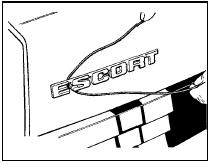
5 To remove these devices, it is recommended that a length of nylon cord is used to separate them from their mounting surfaces (see illustration).

25.5 Removing tailgate adhesive badge
Refitting 6 New emblems have adhesive already applied and a protective backing. Before sticking them into position, clean off all the old adhesive from the mounting surface of the vehicle.
See also:
Engine oil
Checking the engine oil
Refer to the scheduled maintenance guide for the appropriate intervals
for checking the engine oil.
1. Make sure the vehicle is on level ground.
2. Turn the engine off an ...
Modulator (anti-lock braking system) - removal and refitting
Note: Whenever an ABS modulator adjuster
bolt is slackened or removed, the bolt threads
should be lightly coated with grease to
prevent the possibility of bolt seizure. Take
care not to contaminat ...
Ignition system electronic modules - removal and refitting
Amplifier module - electronic
breakerless system
Removal
1 The amplifier module is located on the side
of the distributor (see illustration).
6.1 Electronic amplifier module locations
A Early ...
