Interior trim panels - removal and refitting
Rear quarter trim panel
Removal
1 Unbolt the seat belt from its floor mounting.
2 Pass the belt buckle slide through the panel aperture.
3 Pull the seat cushion and backrest forward.
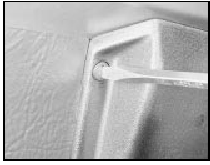
4 Extract the single screw from the quarter panel and then using a suitable forked tool, lever out the clips and remove the panel (see illustration).
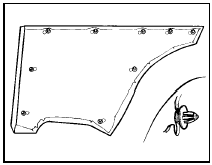
32.4 Rear quarter trim panel securing clip locations
5 The clips and ashtray are detachable after the panel has been withdrawn.
Refitting
6 Refitting is a reversal of removal; tighten the
seat belt anchor bolt to the specified torque.
Cowl side trim panel
Removal
7 Extract the two screws from the scuff plate
(see illustration).
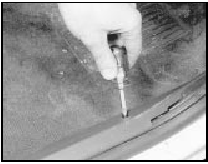
32.7 Removing a sill scuff plate securing screw
8 Remove the two clips and detach the panel by pulling it from its two locating pegs (see illustration).
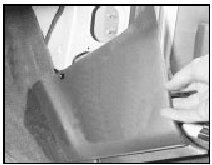
32.8 Removing cowl side trim panel
Refitting 9 Refitting is a reversal of removal.
Windscreen pillar trim panel
Removal
10 Remove the windscreen as described in
Section 20.
11 Pull off the door aperture weatherstrip.
12 Peel back the edges of the trim panel and remove it.
Refitting
13 Refitting is a reversal of removal, but refit
the windscreen as described in Section 20.
Centre pillar trim panels
Removal
14 Remove the two seat belt anchorages
from the pillar.
15 Pull off the weatherstrips from the door apertures.
16 Remove the upper trim panel from the pillar.
17 On three-door models, the rear quarter window will first have to be removed before the pillar trim panel can be withdrawn.
18 The lower trim panel can be removed from the pillar after the four screws have been extracted.
Refitting
19 Refitting is a reversal of removal, but
tighten the seat belt anchor bolts to the
specified torque.
Rear pillar trim panel
Removal
20 Remove the rear seat belt upper
anchorage.
21 Fold down the rear seat back.
22 Extract the five securing screws and remove the trim panel (see illustration).
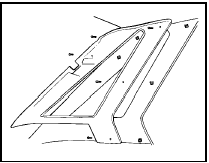
32.22 Rear pillar trim panel securing screw locations
Refitting 23 Refitting is a reversal of removal, but tighten the seat belt anchor bolts to the specified torque.
Tailgate trim panel
24 This comprises a flat panel secured with
push-in type clips. If a rear wiper is fitted, this
will have a moulded cover over the wiper
motor secured by quarter-turn fasteners.
25 To remove the moulded cover, turn the heads of the fasteners through 90° to release them (see illustration).
32.25 Releasing a tailgate moulded cover fastener
Rear wheelhouse covers 26 These are fitted to certain Base and L models and are of moulded type. On Ghia versions the covers are cloth covered while on 5-door versions, the covers have an upper finisher held by two screws.
Load space trim panel
27 These take the form of moulded panels on
“high series” trim models and flat panels on
Base and L versions. The panels are held in
position by external clips.
Door trim panels
28 Refer to Section 11 of this Chapter.
See also:
Radiator fan thermal switch - testing, removal and refitting
Testing
1 The thermal switch is located on the side of
the thermostat housing on early OHV engine
models and in the thermostat housing cover
on later OHV versions. On all CVH engines, the
switch ...
Crankshaft and main bearings - removal and refitting
Note: A new crankshaft rear oil seal and a new
rear oil seal housing gasket should be used on
refitting.
Removal
1 With the engine removed from the vehicle,
remove the timing chain and crankshaft ...
Master cylinder (conventional braking system) - removal, overhaul and
refitting
Note: Before commencing overhaul obtain a
repair kit containing new pistons and seals.
Caution: Refer to the
precautions in Section 1.
Removal
1 Depress the brake pedal several times to
dissipat ...
