Vacuum servo (conventional braking system) - removal and refitting
Caution: Refer to the precautions in Section 1.
Removal
1 To remove the servo, first remove the
master cylinder.
2 Disconnect the vacuum hose from the servo (see illustration).
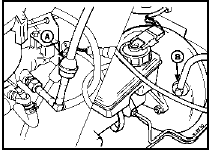
14.2 Servo vacuum hose non-return valve (A) and servo connection (B) -
conventional braking system
3 Working inside the vehicle, remove the lower facia panel from the driver’s side.
4 Remove the clip from the servo pushrod on the brake pedal (see illustration).
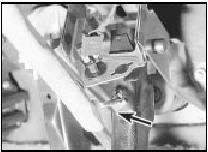
14.4 Remove the clip (arrowed) from the servo pushrod
5 Unscrew the two mounting nuts and washers securing the servo to the bulkhead, and lift the servo from the bulkhead. Note that the two mounting nuts also secure the pedal bracket to the bulkhead.
6 If required, the vacuum hose can be disconnected from the inlet manifold, and the non-return valve can be checked for correct operation by ensuring that it is only possible to blow through it in one direction.
7 No overhaul of the servo is possible, and if faulty, it must be renewed as a complete unit.
Refitting
8 Refitting is a reversal of removal, but when
refitting the servo to the bulkhead, ensure that
the pushrod is correctly located in the pedal
and that the clip is secure.
Vacuum hose - modification 9 From mid-1989, a new type of brake servo vacuum hose-to-inlet manifold connector has been used in production. The connector comprises three parts; a collet which locks the hose in position, an O-ring, and a brass insert which is pressed into the inlet manifold.
10 To disconnect the hose from the inlet manifold, apply light even pressure, push and hold the flange of the collet against the manifold. While holding the collet forward, gently pull the hose from the collet (see illustration). Take care not to pull at an angle or use excessive force, as this can cause the collet to snatch and lock the hose.
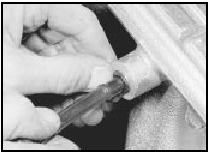
14.10 Disconnecting a later-type brake servo vacuum hose
11 To reconnect the hose, push the hose into the collet until the swage on the hose is hard against the collet flange. Pull gently on the hose to check that it is locked by the collet.
See also:
EEC IV module - removal and refitting
The procedure is as described in Part C of
this Chapter for models with the CFI system. ...
Wheel sensor (ABS) - removal and refitting
Note: A new O-ring must be used when
refitting a sensor.
Front wheel sensor
1 Apply the handbrake, loosen the relevant
front roadwheel nuts, then jack up the front of
the vehicle and support on a ...
Front tie-bar - removal and refitting
Pre-May 1983 1.1 litre models
Removal
1 Jack up the front of the car and support it
on stands (see “Jacking and Vehicle Support”).
2 Unscrew and remove the nut which holds
the tie-bar to the larg ...
