Facia - removal and refitting
Pre-1986 models
Removal
1 Disconnect the battery negative lead.
2 Remove the under-dash cover panels.
3 Refer to Chapter 10 and remove the steering column assembly.
4 Refer to Chapter 12 and remove the instrument panel.
5 Where applicable, refer to Chapter 12 and remove the warning indicator control unit the auxiliary warning system, and where fitted, the fuel computer.
6 Detach the heater controls, switches and wiring multi-plugs, with reference to Chapter 7 Remove the ashtray and cigar lighter mounting panel.
8 Remove the radio and its mounting bracket (Chapter 12).
9 Disconnect the wire from the loudspeaker and remove the speaker (four screws).
10 Remove the glove compartment (Section 31).
11 Where fitted, remove the choke cable (Chapter 4).
12 Detach the vent ducts and demister hoses from the heater.
13 Extract the securing screws and clips and remove the facia panel complete with crash pad (see illustrations).

33.13a Crash pad and facia attachments - pre-1986 Base and L models
A Clip
B Screw
C Nut
D Screw
E Screw
E1 Screw (L models)
F Screw
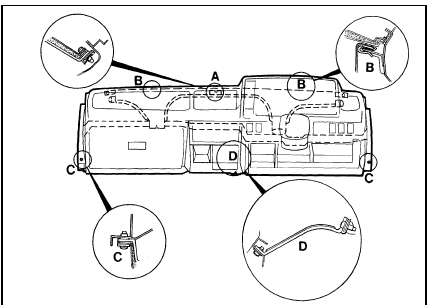
33.13b Crash pad and facia attachments - pre-1986 GL and Ghia models
A Screw B Clip C Screw D Screw
14 The crash padding can be detached by removing the glove compartment mounting bracket and lock bracket, withdrawing the side and centre face level vents and extracting all the securing clips.
Refitting
15 Refitting is a reversal of removal.
1986 models onwards
Removal
16 Disconnect the battery negative lead.
17 Refer to Chapter 10 and remove the steering column assembly.
18 Refer to Chapter 12 and remove the instrument panel.
19 Where applicable, refer to Chapter 12 and remove the warning indicator control unit of the auxiliary warning system and where fitted, the fuel computer.
20 Remove the choke cable, where fitted, as described in Chapter 4.
21 Remove the heater control knobs.
22 Undo the two heater control facia panel screws, pull the panel out and disconnect the wiring multi-plug. Remove the panel.
23 Remove the ashtray.
24 Refer to Chapter 12 and remove the radio or radio/cassette player.
25 Undo the radio/ashtray facia panel screws, withdraw the panel and disconnect the cigar lighter wiring, if fitted. Remove the panel.
26 Remove the glove compartment as described in Section 31.
27 Undo the nine screws and one nut securing the facia, then remove the unit from the car (see illustration).
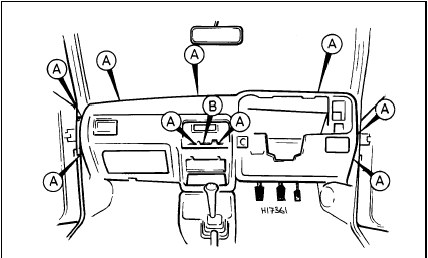
33.27 Crash pad and facia attachments - 1986 models onwards
A Retaining screws B Retaining nuts
28 The crash padding can be removed after undoing the screws from behind the facia.
Refitting
29 Refitting is a reversal of removal.
See also:
Alternator - removal and refitting
Note: Refer to the precautions at the end of
Section 1 before proceeding.
Removal
1 The operations are similar for all makes of
alternator.
2 Disconnect the battery negative terminal,
then disco ...
Rear wheel cylinder (drum brakes) - removal, overhaul and refitting
Caution: Refer to the
precautions in Section 1.
Saloon, Hatchback and Estate
models
1 Chock the front wheels, loosen the relevant
roadwheel nuts, then jack up the rear of the
vehicle and support ...
Engine oil cooler - removal and refitting
Note: Suitable sealant will be required on
refitting - see text.
Removal
1 Remove the engine oil filter (Chapter 1).
2 Note the angle at which the coolant hoses
are set, then disconnect the hoses ...
