Vehicle Identification Numbers
Modifications are a continuing and unpublicised process in vehicle manufacture, quite apart from major model changes. Spare parts manuals and lists are compiled upon a numerical basis, the individual vehicle identification numbers being essential to correct identification of the component concerned.
When ordering spare parts, always give as much information as possible. Quote the vehicle model, year of manufacture, body and engine numbers as appropriate.
The Vehicle Identification Number is located on the plate found under the bonnet above the radiator. The plate also carries information concerning paint colour, final drive ratio etc.
The engine number is located in one of the following places, according to engine type: Front right-hand side of engine block Front face of cylinder block Front left-hand side of engine block Cylinder block above clutch bellhousing A tuning decal will also be found under the bonnet. This illustrates graphically the basic tuning functions, typically plug gap, ignition timing, idle speed and CO level, and (where applicable) valve clearances, points gap and dwell angle.
Additionally, on later models a chassis number is stamped on the floor panel between the driverÆs seat and door, and is covered by a fold back plastic flap.
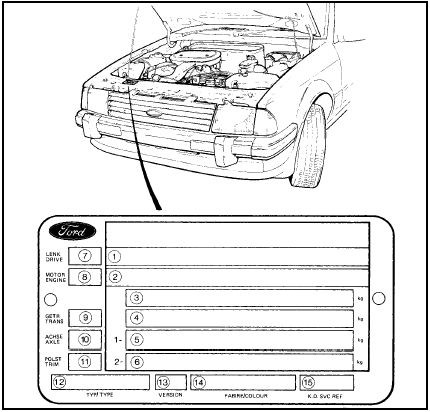
Vehicle identification plate location
1 Type Approval Number
2 Vehicle Identification Number
3 Gross vehicle weight
4 Gross train weight
5 Permitted front axle loading
6 Permitted rear axle loading
7 Steering (LHD/RHD)
8 Engine
9 Transmission
10 Axle (final drive ratio)
11 Trim (interior)
12 Body type
13 Special territory version
14 Body colour
15 KD reference (usually blank) or exhaust
emission level
See also:
Specifications
General
Engine type . . . . . . . . . . . . . . . . . . . . . . . . . . . . . . . . . .
. . . . . . . . . . . . . Four-cylinder, in-line overhead valve
Capacity:
1.1 litre:
OHV engines . . . . . ...
Accelerator pedal - removal and refitting
The procedure is the same as described in
Part A of this Chapter for carburettor models. ...
Engine/manual gearbox assembly - removal and separation
Note: A suitable hoist and lifting tackle will be
required for this operation.
1.8 litre (R2A type)
Removal
1 Proceed as described in Section 8,
paragraphs 1 to 15 inclusive.
2 Working inside th ...
