Manual gearbox oil level check (Every 12 000 miles (20 000 km) or 12 months)
1 Place the vehicle over a pit, or raise and support it at front and rear. The vehicle must be level for an accurate check.
2 If the gearbox is hot after a run, allow it to cool for a few minutes. This is necessary because the oil can foam when hot and give a false level reading.
3 Wipe clean around the filler/level plug.
Unscrew the plug and remove it (see illustration).
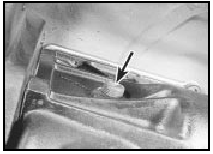
18.3 Gearbox filler/level plug location (arrowed) - N type gearbox
4 Using a suitably marked piece of bent wire as a dipstick, check that the oil level is as shown in the table at the top of this page, according to gearbox type.
5 Top-up the level if necessary, using clean oil of the specified type. Do not overfill, as this can lead to leakage and difficult gear changing. Allow excess oil to drip out of the filler/level hole if necessary. Refit and tighten the filler/level plug on completion.
6 The frequent need for topping-up can only be due to leaks, which should be rectified.
The most likely sources of leaks are the rear extension housing and input shaft oil seals.
7 No periodic oil changing is specified, and no drain plug is fitted.
Hinge and lock check and lubrication (Every 12 000 miles (20 000 km) or 12 months)
1 Work around the vehicle, and lubricate the bonnet, door and tailgate hinges with a light machine oil.
2 Lightly lubricate the bonnet release mechanism and exposed sections of inner cable with a smear of grease.
3 Check the security and operation of all hinges, latches and locks, adjusting them where required. Where applicable, check the operation of the central locking system.
4 Check the condition and operation of the tailgate struts, renewing them if either is leaking or is no longer able to support the tailgate securely when raised.
See also:
Idle speed control valve - removal and refitting
Note: A new gasket must be used when
refitting the valve.
2.0 litre SOHC models
1 Disconnect the battery negative lead.
2 Disconnect the idle speed control valve
wiring plug by releasing the reta ...
Door interior handle - removal and refitting
Removal
1 Remove the door inner trim panel.
2 Where necessary for improved access, peel
back the waterproof plastic sheet from the
door.
3 Remove the two securing screws in the
case of models up ...
Fuel pump - testing
1 If the fuel pump is functioning, it should be
possible to hear it “buzzing” by listening
under the rear of the vehicle when the ignition
is switched on. Unless the engine is started,
the fuel pu ...
