Engine coolant renewal (Every 36 000 miles (60 000 km) or 3 years)
Caution: Before proceeding, note the precautions given in Chapter 3, Section 1.
1 Disconnect the battery negative lead.
2 It is preferable to drain the cooling system with the engine cold. If this is not possible, take precautions against scalding when removing the expansion tank cap. Place a thick rag over the cap and slacken the cap a little to release any pressure. When all pressure has been released, carry on unscrewing the cap and remove it.
3 Early models have no radiator drain plug, so the radiator must be drained by detaching the bottom coolant hose from the outlet on the right-hand side of the radiator. Later SOHC models have a drain plug located in the base of the left-hand radiator end tank, whilst all CVH models have a drain plug in the right-hand radiator end tank and DOHC models have a plug to the bottom right-hand side of the radiator.
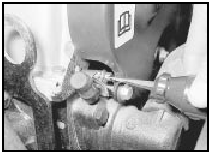
4 Certain SOHC models have a bleed spigot on the thermostat housing, which is covered by a rubber cap. The cap should be removed from the spigot before commencing draining (see illustration).

46.4 Unscrew the clip and remove the rubber cap from the bleed spigot - SOHC
models
5 With the expansion tank cap removed, place a suitable container beneath the radiator bottom hose or drain plug as applicable.
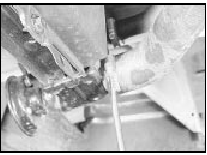
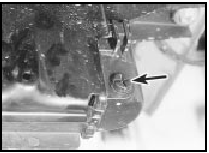
6 On early models, loosen the clip and ease the bottom hose away from the radiator outlet. On later models, unscrew the drain plug (see illustrations). Allow the coolant to drain into the container.

46.6a Disconnect the bottom hose from the radiator - early OHC models

46.6b Radiator drain plug (arrowed) - later CVH models
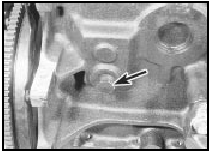
7 On SOHC models, place a second container beneath the drain plug on the right-hand side of the cylinder block (see illustration).

46.7 Cylinder block drain plug (arrowed) - SOHC models (engine removed)
Unscrew the drain plug and allow the coolant to drain into the container.
No cylinder block drain plug is fitted on CVH and DOHC models.
8 Dispose of the drained coolant safely.
9 After some time the radiator and engine waterways may become restricted or even blocked with scale or sediment, which reduces the efficiency of the cooling system.
When this occurs, the coolant will appear rusty and dark in colour and the system should then be flushed.
10 Disconnect the top hose from the radiator, then insert a garden hose and allow water to circulate through the radiator until it runs clear from the outlet.
11 Insert the hose in the expansion tank filler neck and allow water to run out of the bottom hose (and cylinder block on SOHC models) until clear. If, after a reasonable period the water still does not run clear, the radiator can be flushed with a good proprietary cleaning agent.
12 Disconnect the inlet hose from the inlet manifold, connect the garden hose and allow water to circulate through the manifold, automatic choke (where applicable), heater and out through the bottom hose until clear.
13 In severe cases of contamination the system should be reverse flushed. To do this, remove the radiator, invert it and insert a hose in the outlet. Continue flushing until clear water runs from the inlet.
14 The engine should also be reverse flushed. To do this, remove the thermostat and insert the hose into the cylinder head on SOHC models, or into the inlet manifold on CVH and DOHC models. Continue flushing until clear water runs from the bottom hose (and cylinder block on SOHC models).
15 Where applicable, refit the radiator and the thermostat.
16 Reconnect any disturbed hoses and refit and tighten the cylinder block drain plug and/or radiator drain plug, as applicable.
17 On SOHC models fitted with a bleed spigot on the thermostat housing, ensure that the rubber cap is removed before refilling the system.
18 Pour coolant in through the expansion tank filler hole until the level is up to the “MAX” mark.
19 Where applicable, refit the rubber cap to the bleed spigot when coolant starts to emerge from the spigot. Tighten the clip.
20 Squeeze the coolant hoses to help disperse air locks. Top-up the coolant further if necessary, then refit and tighten the expansion tank cap.
21 Run the engine up to operating temperature, checking for coolant leaks. Stop the engine and allow it to cool, then re-check the coolant level. Top-up the level as necessary, taking care to avoid scalding as the expansion tank cap is removed.
See also:
Sump - removal and refitting
Note: New gaskets and sealing strips must be
used on refitting.
Removal
1 Disconnect the battery negative lead.
2 Drain the engine oil.
3 Remove the starter motor as described in
Chapter 5, Part ...
Engine/manual gearbox assembly - removal and separation
Note: A suitable hoist and lifting tackle will be
required for this operation.
1.8 litre (R2A type)
Removal
1 Proceed as described in Section 8,
paragraphs 1 to 15 inclusive.
2 Working inside th ...
Air cleaner - removal and refitting
2.0 litre SOHC models
1 Disconnect the battery negative lead.
2 Depress the locking clip on the airflow
meter wiring plug and disconnect the plug.
Pull on the plug, not the wiring.
3 Loosen the s ...
