Camshaft and cam followers - removal, inspection and refitting
Note: A new camshaft oil seal should be used when refitting the camshaft.
Removal
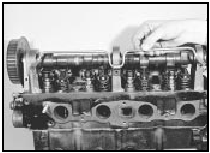
1 Remove the cylinder head.
2 Hold the camshaft stationary using a suitable spanner on the cast boss behind the No 6 valve cam, and unscrew the camshaft sprocket bolt and washer.
3 Remove the camshaft sprocket, using a suitable puller if necessary, and withdraw the sprocket backplate, noting which way round it is fitted.
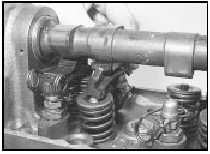
4 Remove the three securing bolts and withdraw the camshaft oil supply tube (see illustration).
24.4 Withdrawing the camshaft oil supply tube
5 Note how the cam follower retaining springs are fitted, then unhook them from the cam followers (see illustration).
24.5 Note how the cam follower retaining springs are fitted
6 Loosen the locknuts and back off the ballpin adjuster nuts until the cam followers can be removed (see illustration). Note their locations for use when refitting. It will be necessary to rotate the camshaft during this operation.
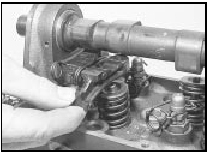
24.6 Removing a cam follower
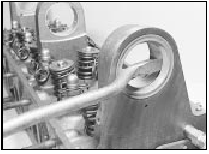
7 Unscrew the two bolts and remove the camshaft thrustplate from the rear bearing housing (see illustration).
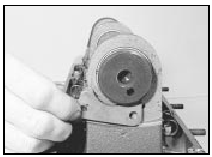
24.7 Unscrew the securing bolts and remove the camshaft thrustplate
8 Carefully withdraw the camshaft from the rear of the cylinder head taking care not to damage the bearings (see illustration).
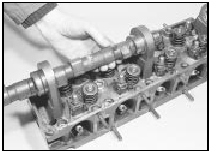
24.8 Withdrawing the camshaft
9 Prise the oil seal from the front bearing in the cylinder head (see illustration).
24.9 Prising out the camshaft oil seal
Inspection
10 Examine the surfaces of the camshaft
journals and lobes, and the cam followers for
wear. If wear is excessive, considerable noise
would have been noticed from the top of the
engine when running, and a new camshaft
and followers must be fitted.
11 Check the camshaft bearings for wear, and if necessary have them renewed by a Ford dealer.
12 Check the camshaft oil supply tube for obstructions, making sure the jet holes are clear.
Refitting
13 Commence refitting by driving a new oil
seal into the cylinder head front bearing, using
a suitable tube drift or socket (see
illustration). Smear the seal lip with clean
engine oil.
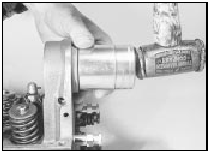
24.13 Fitting a new camshaft oil seal using a socket
14 Lubricate the camshaft, bearings and thrustplate with SAE 80/90 hypoid oil, then carefully insert the camshaft from the rear of the cylinder head, taking care not to damage the bearings.
15 Locate the thrustplate in the camshaft groove, then insert and tighten the bolts.
16 Using a dial test indicator if available, or feeler blades, check that the camshaft endfloat is within the limits given in the Specifications. If not, renew the thrustplate and re-check. If this does not bring the endfloat within limits, the camshaft must be renewed.
17 Lubricate the ball-pins with SAE 80/90 hypoid oil, then refit the cam followers to their original locations, and refit the retaining springs as noted during removal. It will be necessary to rotate the camshaft during this operation.
18 Fit the oil supply tube and tighten the bolts.
19 Fit the camshaft sprocket backplate, as noted during removal.
20 Fit the camshaft sprocket, then insert and tighten the bolt (with washer in place) to the specified torque, holding the camshaft stationary as described in paragraph 2.
21 With the cylinder head supported on blocks of wood, adjust the valve clearances.
This work is easier to carry out on the bench rather than in the vehicle.
22 Refit the cylinder head.
See also:
Pistons/connecting rods - removal and refitting
Removal
1 Remove the sump, as described in Section
8, and the cylinder head, as described in
Section 7.
2 Check that the connecting rod and cap
have adjacent numbers at their big-end to
indicate ...
Valve clearance adjustment - OHV and HCS engines (Every 12 000
miles or 12 months)
OHV engines
1 This operation should be carried out with
the engine cold and the air cleaner and rocker
cover removed.
2 Using a ring spanner or socket on the
crankshaft pulley bolt, turn the cran ...
Radio/cassette player - removal and refitting
Standard fixing
1 Disconnect the battery negative lead.
2 Pull off the two control knob assemblies.
3 Release the trim panel by unscrewing the
two securing nuts from the control spindles.
Remove ...
