Pistons and connecting rods - removal and refitting
Removal
1 Remove the sump and the cylinder head.
2 Check the big-end bearing caps for identification marks and if necessary use a centre-punch to identify the caps and corresponding connecting rods (see illustration).
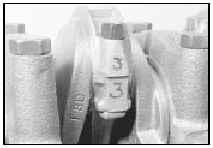
32.2 Big-end cap and connecting rod identification numbers
3 Turn the crankshaft so that No 1 crankpin is at its lowest point, then unscrew the nuts and tap off the bearing cap. Keep the bearing shells in the cap and connecting rod.
4 Using the handle of a hammer, push the piston and connecting rod up the bore and withdraw from the top of the cylinder block.
Loosely refit the cap to the connecting rod.
5 Repeat the procedure in paragraphs 3 and 4 on No 4 piston and connecting rod, then turn the crankshaft through half a turn and repeat the procedure on Nos 2 and 3 pistons and connecting rods.
Refitting
6 Commence refitting as follows.
7 Clean the backs of the bearing shells and the recesses in the connecting rods and bigend caps.
8 Press the bearing shells into the connecting rods and caps in their correct positions and oil them liberally. Note that the lugs in corresponding shells must be adjacent to each other (see illustration).
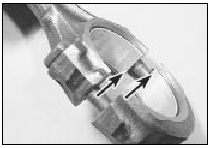
32.8 The bearing shell lugs (arrowed) must be adjacent to each other
9 Lubricate the cylinder bores with clean engine oil.
10 Fit a piston ring compressor to No 1 piston, then insert the piston and connecting rod into No 1 cylinder (see illustration).
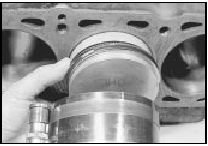
32.10 Fitting a piston ring compressor
With No 1 crankpin at its lowest point, drive the piston carefully into the cylinder with the wooden handle of a hammer, and at the same time guide the connecting rod onto the crankpin. Make sure that the arrow on the piston crown is facing the front of the engine.
11 Oil the crankpin, then fit the big-end bearing cap in its previously noted position, and tighten the nuts to the specified torque.
12 Check that the crankshaft turns freely.
13 Repeat the procedure given in paragraphs 11 to 13 inclusive on the remaining pistons.
14 Refit the cylinder head and the sump.
See also:
Fuel pump - cleaning
Note: Refer to the warning at the end of
Section 1 before proceeding.
1 On certain early models the fuel pump has
a detachable cover allowing access to the
internal filter for cleaning. If this ty ...
Aerial - removal and refitting
Manually-operated type - all
models except Cabriolet
Removal
1 Withdraw the radio (Section 21) until the
aerial lead can be pulled out of the receiver
socket.
2 Working under the front wing, rel ...
Introduction
General information
This Chapter is designed to help the home
mechanic maintain his/her vehicle for safety,
economy, long life and peak performance.
The Chapter contains a master
maintenance sche ...
