Oil pump - removal and refitting
Note: A suitable puller will be required to remove the crankshaft pulley. A new crankshaft pulley bolt, a new lower timing chain cover gasket, and a new oil pump gasket, must be used on refitting.
Removal
1 If the engine is in the car, carry out the
following operations:
a) Disconnect the battery negative lead.
b) To improve access, remove the radiator. It will be difficult to remove the crankshaft pulley with the radiator in place.
c) On fuel injection models, remove the air inlet hose, plenum chamber, and air cleaner lid as an assembly.
2 Proceed as described in paragraphs 3 to 10 of Section 15.
3 Unscrew the four securing bolts, and withdraw the oil pump from the cylinder block (see illustrations). Recover the gasket.
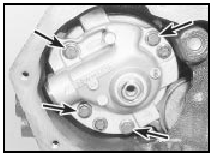
26.3a Oil pump securing bolts (arrowed)
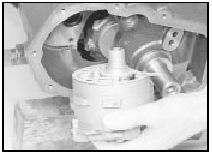
26.3b Withdrawing the oil pump
Refitting
4 Thoroughly clean the mating faces of the
pump and the cylinder block.
5 Prime the pump by injecting clean engine oil into it and turning it by hand.
6 Place a new gasket on the oil pump flange, ensuring that the gasket is correctly located so that its holes align with the oil passages in the pump.
7 Fit the oil pump, and tighten the securing bolts to the specified torque.
8 Proceed as shown in paragraphs 27 to 39 of Section 15.
9 If the engine is in the vehicle, reverse the operations described in paragraph 1.
See also:
Auxiliary warning system components - removal and refitting
General
1 This system monitors the fluid levels and
front brake pads for excessive wear. In the
event of a fluid level dropping below the
specified level, or the brake pads wearing
down to the mi ...
Timing belt and sprockets - removal and refitting
Note: The belt tension should be checked
using Ford special tool No 21-113 after
refitting. A suitable puller may be required to
remove the sprockets. If the camshaft
sprocket is removed, a new re ...
Cylinder head - removal and refitting
Carburettor engines
Removal
Note: The cylinder head must only be
removed when the engine is cold. New
cylinder head bolts and a new gasket must be
used on refitting.
1 Disconnect the battery ear ...
