Bulbs
Replacing exterior bulbs
Check the operation of all the bulbs frequently.
Using the right bulbs
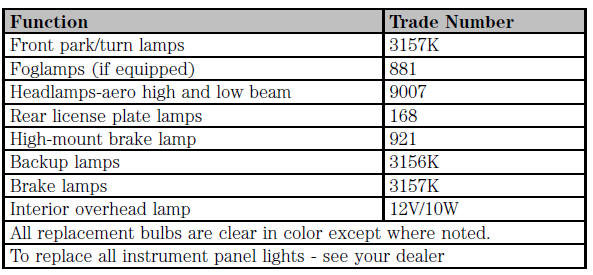
Replacement bulbs are specified in the chart below. Headlamp bulbs must be marked with an authorized "D.O.T." for North America and an "E" for Europe to assure lamp performance, light brightness, light pattern and safe visibility. The correct bulbs will not damage the lamp assembly or void the lamp assembly warranty and will provide quality bulb burn time.
INTERIOR BULBS
Dome lamp
1. Remove the lamp lens by applying pressure to both tabs at the top of the lamp and pulling lens downward.
2. Pull out the burned-out bulb and install a new one.
3. Install the lamp lens by applying pressure to both sides of the lamp lens and popping the lamp lens up on the assembly.
Map lamps
For bulb replacement, see a qualified service technician or your dealer.
Replacing headlamp bulbs
1. Make sure the headlamp switch is in the OFF position..
2. Open the hood and disconnect the headlamp wiring socket from the in-line connector. This will make it easier to change the bulb.
3. Remove the protective dust shield
from the housing by turning the
dust shield counterclockwise (when
viewed from the rear) 
4. Disconnect the electrical connector from the bulb by pulling rearward.
5. Remove the bulb retaining ring by
rotating it counterclockwise. 
6. Without turning, remove the old
bulb from the lamp assembly by
pulling it straight back out of the
lamp assembly and replace. 
Handle a halogen headlamp bulb carefully and keep out of children's reach. Grasp the bulb only by its plastic base and do not touch the glass. The oil from your hand could cause the bulb to break the next time the headlamps are operated.
7. Install the new bulb in lamp assembly by pushing straight in with the bulb's plastic base facing upward. Turn the bulb slightly to align the grooves in the plastic base with the tabs in the lamp assembly.
8. Install the bulb retaining ring over the plastic base and lock the ring by rotating it clockwise until it snaps into place.
9. Connect the electrical connector into the plastic base until it "snaps."
10. Install the protective dust shield and lock the shield by rotating it clockwise until it locks into position.
11. Connect the headlamp wiring socket to the in-line connector.
12. Turn the headlamps on and make sure they work properly. If the headlamp was correctly aligned before you changed the bulb, you should not need to align it again.
Replacing front parking lamp/turn signal bulbs
1. Make sure the headlamp switch is in the OFF position.
2. Open the hood and disconnect the headlamp wiring socket from the in-line connector. This will make it easier to change the bulb.
3. Remove the protective dust shield from the housing by turning the dust shield counterclockwise (when viewed from the rear).
4. Disconnect the electrical
connector from the bulb by pulling
rearward. 
Replacing foglamp bulbs
1. Make sure the headlamp switch is
in the OFF position and then
remove the bulb socket from the
foglamp by turning
counterclockwise. 
2. Disconnect the electrical connector fromthe foglamp bulb.
3. Connect the electrical connector to the new foglamp bulb.
4. Install the bulb socket in the foglamp turning clockwise.
Replacing high-mount brakelamp bulbs
To remove the brakelamp bulb:
1. Push the center of the push pins in to release tension.
2. Pull the push pins out of the cover and slide the cover away from the package tray.
3. Remove the bulb by rotating it counterclockwise and pulling it out of the lamp assembly.
4. Carefully pull out the bulb straight out of the socket and push in new bulb.
To install the brakelamp bulb:
1. Install the bulb into the lamp assembly and rotate clockwise.
2. Install the push pins in the cover far enough that the pins protrude outside of the cover about 6 mm (1/4 inch).
3. Install the cover and secure with the push pins.
Tail lamp/turn signal/backup lamp bulbs
The tail/turn signal lamp and backup
lamp bulbs are located in the same
portion of the tail lamp assembly,
one just below the other. Follow the
same steps to replace either bulb.
1. Make sure the headlamp switch is in the OFF position and then open trunk to expose the tail lamp assembly screws. Remove the two screws from the front of the lamp.
2. The tail lamp has hidden fasteners which can be disengaged by hitting the lamp, with the side of your hand, toward the side of the vehicle.
3. Pull lamp assembly away from vehicle for access to bulbs.
4. Remove the bulb socket by rotating it counterclockwise, then pulling it out of the lamp assembly.
5. Pull the bulb from the socket and push in the new bulb.
6. Install the bulb socket into the lamp by rotating it clockwise.
7. Position the tail lamp on the vehicle and gently tap the lens to engage the clips. Install the screws.
License plate lamps
To change the license plate bulbs:
1. Remove two screws and the license plate lamp assembly from the rear bumper.
2. Carefully pull the bulb out from the lamp assembly and push in the new bulb.
3. Install the lamp assembly on rear bumper with two screws.
See also:
Deceleratio sensitive valve (all models with conventional braking system) - removal and refitting
Caution: Refer to the precautions in Section 1.
Removal
1 The deceleration sensitive valve is located on the left-hand side of the engine compartment (see illustrations).
23.1a Early type decele ...
Crankshaft front oil seal - renewal
1.8 litre (R2A type)
1 Remove the timing belt and the crankshaft
sprocket and thrustwasher.
2 Withdraw the oil seal using an oil seal
removal tool or by drilling the oil seal outer
face and using ...
Sump - removal and refitting
Note: A new gasket and new sump bolts must
be used when refitting, and suitable sealant will
be required (available from a Ford dealer). Note
that it is preferable to keep the engine upright
until ...
