Crankshaft front oil seal - renewal
1.8 litre (R2A type)
1 Remove the timing belt and the crankshaft
sprocket and thrustwasher.
2 Withdraw the oil seal using an oil seal removal tool or by drilling the oil seal outer face and using self-tapping screws and a pair of grips.
3 Clean the oil seal housing, then smear the lip of a new oil seal with clean engine oil.
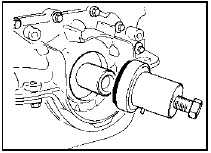
4 Fit the oil seal using the crankshaft pulley bolt and a suitable tool similar to that shown (see illustration).

25.4 Using a special tool to fit the crankshaft front oil seal - 1.8 litre
(R2A)
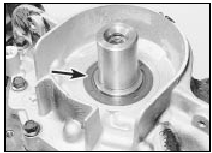
5 As the seal is drawn into position, the inner edge of the seal may be damaged as it passes over the end of the shaft. To prevent this, as soon as the seal begins to locate in the housing remove the tools being used to fit the seal, and carefully work the inner edge of the seal over the end of the crankshaft, using a small screwdriver or similar blunt tool. The seal can then be pushed home using the tools described previously (see illustration).

25.5 Crankshaft front oil seal (arrowed) located in oil pump housing - 1.8
litre (R2A)
6 Refit the thrustwasher, crankshaft sprocket and timing belt.
1.6 and 1.8 litre (R6A type) 7 Remove the timing belt, and the crankshaft sprocket and thrustwasher.
8 Proceed as described in paragraphs 2 to 4 inclusive.
9 Refit the thrustwasher, crankshaft sprocket and timing belt.
See also:
General information
OHV engines
The 1.1 litre and 1.3 litre OHV engines are
of four-cylinder, in-line overhead valve type
(hence OHV), mounted transversely together
with the transmission, at the front of the car.
Th ...
Engine valve clearance check (Every 12 000 miles (20 000 km) or 12 months)
SOHC engines
1 The valve clearances must be checked with
the engine cold. On carburettor models
remove the air cleaner.
2 Disconnect the HT leads from the spark
plugs and release them from the cl ...
Fuel cut-off (inertia) switch - removal and refitting
The procedure is as described in Part C of
this Chapter for models with the CFI system. ...
