Thermo-viscous cooling fan (SOHC models) - removal and refitting
Removal
1 Disconnect the battery negative lead.
2 Remove the four retaining clips and unscrew the two retaining screws, then withdraw the upper section of the fan shroud (see illustrations).
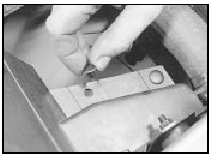
12.2a Remove the retaining clips followed by the screws . . .
12.2b . . . and withdraw the upper section of the fan shroud
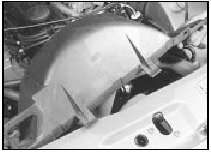
3 The cooling fan hub nut must now be unscrewed from the coolant pump drive flange. A thin cranked 32.0 mm (1.25 in AF) spanner with a jaw thickness not exceeding 5.0 mm (0.2 in) will be required (see illustration). Alternatively, if two of the coolant pump pulley bolts are removed, a normal thickness spanner can be used. Note that the fan hub nut has a left-hand thread, (ie it is undone in a clockwise direction.) If the pulley turns as the nut is undone, remove the drivebelt, and clamp an old drivebelt round the pulley to restrain it, using self-locking pliers. Tap the spanner with a mallet if required to remove the nut.
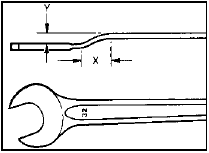
12.3 Modified spanner required for removing the thermo-viscous cooling fan X
= 25.0 mm (1.0 in) Y = 12.0 mm (0.5 in)
4 If required, the fan blades can be separated from the fan hub by unscrewing the four securing bolts.
Refitting
5 Refitting is a reversal of removal, but where
applicable, take care not to overtighten the
bolts securing the fan blades to the fan hub,
as thread damage may require the whole unit
to be renewed. Where applicable, refit and
tension the drivebelt.
See also:
Fuel computer components - removal and refitting
Computer unit
Removal
1 Disconnect the battery negative terminal.
2 Undo the two instrument panel bezel
retaining screws and ease the bezel out to
release the lower clips.
3 Withdraw the compute ...
Crankshaft front oil seal - renewal
1.8 litre (R2A type)
1 Remove the timing belt and the crankshaft
sprocket and thrustwasher.
2 Withdraw the oil seal using an oil seal
removal tool or by drilling the oil seal outer
face and using ...
Steering tie-rod outer balljoint - renewal
1 If as the result of inspection the tie-rod
outer balljoints are found to be worn, remove
them as described in Section 20.
2 When the balljoint nuts are unscrewed, it is
sometimes found that the ...
