Heater unit - removal and refitting
Removal
1 Disconnect the battery negative lead.
2 If the coolant is still hot, release the pressure in the system by slowly unscrewing the expansion tank cap. Place a thick rag over the cap to prevent scalding as the pressure is released.
3 Note the location of the two heater hoses on the engine compartment bulkhead, then disconnect and plug them (see illustration).
визовый центр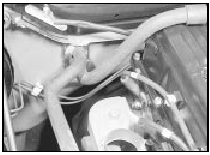
18.3 Location of heater hoses on engine compartment bulkhead
Alternatively, the hoses can be secured high enough to prevent the coolant from draining.
4 To prevent unnecessary spillage of coolant when the heater unit is removed, blow into the upper heater pipe until all the coolant has been expelled through the lower pipe.
5 Remove the two securing screws and withdraw the heater pipe cover from the bulkhead (see illustration). Recover the gasket.

18.5 Heater pipe cover
6 Working inside the vehicle, remove the passenger side lower facia panel.
7 Disconnect the ends of the two control cables from the heater by removing the two retaining screws.
8 Detach the five vent hoses from the heater.
9 Unscrew the two mounting bolts, and move the heater to the rear until the pipes are clear of the bulkhead, then withdraw the heater to the left. If necessary, remove the lower facia bracket (see illustration).
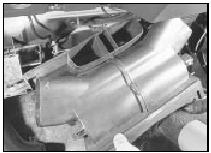
18.9 Withdrawing the heater
Refitting
10 Refitting is a reversal of removal, but
adjust the control cables by moving the levers
on the control panel to the top and then the
bottom stops. Considerable resistance may
be encountered when moving the levers
towards the bottom stops, which should be
overcome.
11 On completion, top-up the coolant level.
See also:
Brake hydraulic fluid renewal (Every 36 000 miles (60 000 km) or 3 years)
1 An assistant and bleeding equipment will
be needed. A considerable quantity of
hydraulic fluid will be required - probably
about 2 litres (nearly half a gallon).
2 Slacken the front wheel nuts. ...
Temperature gauge sender unit - removal and refitting
Note: Suitable jointing compound will be
required on refitting.
Removal
1 With the engine cold unscrew the pressure
cap on the thermostat housing or expansion
tank as applicable, then refit it. T ...
General information
All models utilise a light alloy inlet manifold
which on carburettor models is coolant
heated to improve the atomisation of the
fuel/air mixture.
The exhaust manifold is of cast iron
construction ...
