Crankshaft rear oil seal - renewal
Note: New flywheel/driveplate bolts must be used on refitting.
1 Remove the flywheel/driveplate and the engine adapter plate.
2 Extract the seal using an oil seal removal tool if available. It may also be possible to remove the oil seal by drilling the outer face and using self-tapping screws and a pair of grips.
3 Clean the oil seal housing, then carefully wind a thin layer of tape around the edge of the crankshaft to protect the oil seal lip as the seal is installed.
4 Ideally, the new oil seal should be installed using a tool similar to that shown (see illustration).
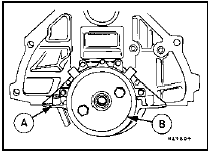
24.4 Tool used to fit crankshaft rear oil seal
A Rear oil seal housing B Special tool
A suitable tool can be improvised using a metal tube of suitable diameter, a metal disc or flat bar, and two flywheel bolts. Draw the seal into position using the two flywheel bolts. Make sure that the seal lip faces into the engine.
5 With the oil seal installed, carefully pull the tape from the edge of the crankshaft.
6 Refit the engine adapter plate and the flywheel/driveplate.
See also:
Spark plug renewal (Every 12 000 miles or 12 months)
The procedure is as described for RS Turbo
models in Section 15. ...
Temperature gauge sender removal and refitting
Removal
1 On SOHC models, the temperature gauge
sender is located on the front left-hand side of
the cylinder head, just in front of the inlet
manifold. On CVH models, the sender is
located on th ...
Brake drum - inspection and renewal
Note: Before starting work, refer to the note at
the beginning of Section 2 concerning the
dangers of asbestos dust.
1 Whenever a brake drum is removed, brush
out dust from it, taking care not to ...
