Fuel vapour separator (models from 1985) - removal and refitting
Caution: Refer to the precautions in Section 1 before proceeding.
Removal
1 On SOHC models, the vapour separator is
located on the left-hand side of the engine
compartment. On CVH models, the vapour
separator is located on the right-hand side of
the engine compartment (see illustrations).
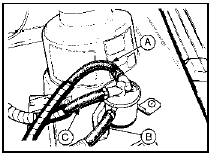
6.1a Fuel vapour separator location 2.0 litre SOHC models from 1985
A Fuel return hose
B Fuel supply hose
C Carburettor fuel feed hose
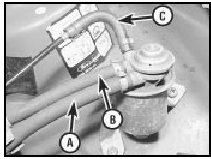
6.1b Fuel pressure regulator/vapour separator location - SOHC models from
1985
A Fuel supply hose B Carburettor fuel feed hose C Fuel return hose
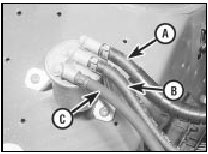
6.1c Fuel vapour separator location - CVH models
A Fuel supply hose B Carburettor fuel feed hose C Fuel return hose
2 Disconnect the battery negative lead.
3 Identify the fuel hose locations as an aid to refitting, then disconnect and plug the hoses.
4 Remove the two securing screws and withdraw the vapour separator.
Refitting
5 Refitting is a reversal of removal, ensuring
that the fuel hoses are correctly connected. If
the hoses were originally secured with
crimped type clips, discard them and use new
worm drive clips.
See also:
Air cleaner - removal and refitting
K-Jetronic system
Removal
1 Remove the air cleaner element as
described in Chapter 1.
2 Detach the fuel filter from the side of the
cleaner casing (leave the fuel lines attached to
the filter) a ...
Timing belt - removal, refitting and adjustment
Removal
Note: From April 1988 (build code JG) a
modified timing belt tensioner incorporating a
larger diameter tensioner roller was
introduced, and from October 1988 an
improved timing belt was u ...
Buying Spare Parts
Spare parts are available from many sources,
including maker’s appointed garages, accessory
shops, and motor factors. To be sure of
obtaining the correct parts, it will sometimes be
necessary to q ...
