Front suspension lower arm - removal, overhaul and refitting
Note: A balljoint separator tool will be required for this operation.
Removal
1 To improve access, raise the front of the
vehicle on ramps. Do not jack the vehicle up
at this stage. Apply the handbrake.
2 Unscrew and remove the nut, washer and pivot bolt securing the relevant lower arm to the crossmember (see illustration).
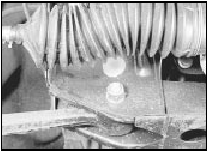
3.2 Front suspension lower arm-tocrossmember pivot bolt and nut
3 Remove the anti-roll bar-to-lower arm securing nut and recover the dished washer and plastic cover (where applicable) (see illustration).
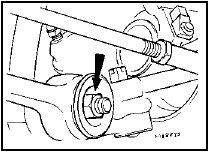
3.3 Front anti-roll bar-to-lower arm securing nut (arrowed)
4 Ensure that the handbrake is applied, jack up the front of the vehicle and support on axle stands (see “Jacking and Vehicle Support”).
5 Remove the split pin and unscrew the castellated nut from the lower arm balljoint.
Using a balljoint separator tool, disconnect the lower arm from the hub carrier. The lower arm can now be withdrawn from the vehicle.
Recover the remaining dished washer and plastic cover (where applicable) from the end of the anti-roll bar.
Overhaul
6 If the lower arm has been removed due to a
worn balljoint, the complete arm must be
renewed.
7 The anti-roll bar compliance bushes can be renewed as described in Section 8, but note that the bushes on both sides of the vehicle must be renewed at the same time. The lower arm inner pivot bush can be renewed as described in Section 9.
Refitting
8 To refit the lower arm, proceed as follows.
9 Fit the shallow dished washer (colour coded black or green) and the plastic cover (where applicable) to the end of the anti-roll bar, then refit the lower arm to the anti-roll bar. Fit the remaining plastic cover (where applicable) and the deep dished washer (colour coded yellow or black) and refit the securing nut. Do not tighten the nut at this stage. Note that the convex faces of the dished washers must face the lower arm.
10 Reconnect the balljoint to the hub carrier, refit the castellated nut and tighten to the specified torque. Fit a new split pin.
11 Locate the end of the lower arm in the crossmember and refit the pivot bolt, washer and nut. If necessary, push the outer rim of the roadwheel in order to line up the holes in the lower arm bush and the crossmember.
Note that the pivot bolt head should face to the rear of the vehicle. Do not tighten the bolt at this stage.
12 Lower the vehicle so that its weight is resting on the roadwheels, and bounce the vehicle to settle the suspension.
13 Tighten the lower arm pivot bolt, following the procedure given in Section 2.
14 Tighten the anti-roll bar-to-lower arm securing nut to the specified torque.
15 Lower the vehicle from the ramps, if not already done.
See also:
Ignition switch - removal and refitting
Pre-1986 models
Removal
1 Disconnect the battery, undo the screws
and remove the steering column lower
shroud.
2 Insert the ignition key into the lock and turn
it to position I.
3 Using a flat- ...
Engine oil and filter renewal (Every 6000 miles (10 000 km) or 6 months)
1 Frequent oil and filter changes are the most
important preventative maintenance
procedures which can be undertaken by the
DIY owner. As engine oil ages, it becomes
diluted and contaminated, whic ...
Horn switch assembly - removal and refitting
1 Disconnect the battery negative lead.
Switch
Models up to 1987
2 Pull the trim insert from the centre of the
steering wheel, and disconnect the lead from
the horn push.
3 Disconnect the two le ...
