Carburettor (Weber 2V TLD) - removal and refitting
Caution: Refer to the precautions in Section 1 before proceeding.
Note: A new gasket must be used when refitting the carburettor. A tachometer and an exhaust gas analyser will be required to check the idle speed and mixture on completion.
Removal
1 Disconnect the battery negative lead.
2 Remove the air cleaner.
3 Disconnect the wiring from the antidieselling (anti-run-on) valve.
4 Disconnect the wiring from the automatic choke heater.
5 Disconnect the fuel supply and return hoses, noting their locations to aid refitting.
Plug the ends of the hoses to minimise petrol spillage.
6 Disconnect the link arm from the throttle linkage.
7 Disconnect the vacuum pipe.
8 Release the coolant hose from the bracket under the automatic choke housing.
9 Unscrew the four Torx screws, and lift the carburettor from the inlet manifold. Recover the gasket.
Refitting
11 Refitting is a reversal of removal, bearing
in mind the following points.
12 Ensure that the mating faces of the inlet manifold and the carburettor are clean, and use a new gasket.
13 Ensure that all hoses, pipes and wiring are correctly routed, and free from restrictions. If any of the hoses were originally secured with crimped-type clips, discard these, and use new worm-drive clips on refitting.
14 Make sure that the coolant hose is correctly positioned in the bracket under the automatic choke housing.
15 On completion, check and if necessary adjust the idle speed and mixture.
Carburettor (Weber 2V TLD) - idle speed and mixture adjustment
Refer to Chapter 1, Sections 15 and 16.
Carburettor (Weber 2V TLD) - fast idle speed adjustment
1 Proceed as described for the Weber 2V carburettor, noting the following.
2 The fast idle adjustment screw should be positioned on the third (middle) step of the fast idle cam (see illustration).
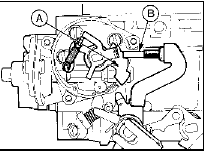
24.2 Fast idle speed adjustment - Weber 2V TLD
carburettor
A Fast idle cam B Adjustment screw on middle step of cam
3 Refer to the Specifications at the beginning of this Chapter for the correct fast idle speed.
See also:
Alternator brushes and regulator - renewal
Bosch alternator
1 With the alternator removed from the
engine, clean the external surfaces free from
dirt.
2 Extract the brush box/regulator screws
from the rear cover and withdraw the brush
bo ...
Carburettors (all types) - dismantling and reassembly
1 A complete strip-down of a carburettor is
unlikely to cure a fault which is not
immediately obvious without introducing new
problems. If persistent carburation problems
are encountered, it is re ...
Throttle valve control motor - removal and refitting
Removal
1 Disconnect the battery negative lead.
2 Remove the air cleaner assembly.
3 Disconnect the wiring plugs from the motor
and the throttle position sensor.
4 Remove the screws securing the ...
