ESC II system components - removal and refitting
Note: Procedures for removal and refitting of the ignition system components and electronic module are given elsewhere in the relevant Sections of this Chapter.
1 Disconnect the battery negative lead.
Engine coolant temperature
sensor
All models except 2.0 litre DOHC
2 The sensor is located in the underside of
the inlet manifold.
3 Partially drain the cooling system. There is no need to remove the cylinder block drain plug.
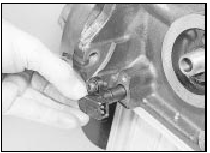
4 Disconnect the sensor wiring plug by pulling on the plug, not the wiring (see illustration).
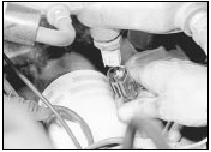
19.4 Disconnect engine temperature sensor wiring plug - ESC II system
5 Unscrew the sensor from the inlet manifold and remove it.
6 Refitting is a reversal of removal. Fill the cooling system.
2.0 litre DOHC models
7 The sensor is located in the side of the inlet
manifold. The removal and refitting
procedures are as described for the 1.6 and
1.8 litre CVH (R6A type) engines in the
relevent Section of this Chapter.
Inlet manifold heater
Note: When refitting the heater, a new gasket
and O-ring must be used.
8 Do not attempt to remove the heater while it is hot.
9 For improved access, remove the air cleaner.
10 Disconnect the wiring from the heater.
11 Unscrew the three securing bolts and remove the heater. Recover the gasket and O-ring (see illustration).
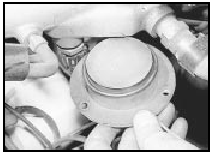
19.11 Removing inlet manifold heater - ESC II system
12 Refitting is a reversal of removal, using a new gasket and O-ring, but be careful to tighten the securing bolts evenly, otherwise the heater may tilt and jam in its recess.
Carburettor stepper motor (2.0
litre models)
Note: Irregular idle is not necessarily caused by
a faulty or badly adjusted stepper motor. Good
electrical contact between the stepper motor
plunger and the adjusting screw (which from the
throttle position switch) is essential. Before
attempting adjustment or renewal of the motor,
try the effect of cleaning the plunger and
adjusting screw contact faces with abrasive
paper followed by switch cleaning fluid. Switch
cleaning fluid is available from electronic
component shops. Refer to the precautions in
Chapter 3 before proceeding.
13 Remove the air cleaner.
14 Depress the locking tab and disconnect the stepper motor wiring plug. Pull on the plug, not the wiring.
15 Remove the four securing screws and withdraw the stepper motor and bracket from the carburettor.
16 If desired, the stepper motor can be separated from the bracket by removing the four securing screws (see illustration).
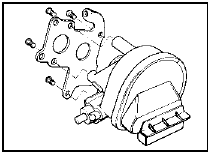
19.16 Carburettor stepper motor adjustment - 2.0 litre models with ESC II
system
17 Commence refitting by securing the stepper motor to the bracket, where applicable.
18 Refit the stepper motor and bracket to the carburettor and secure with the four screws.
19 Reconnect the wiring plug.
20 Reconnect the air cleaner vacuum hose to the inlet manifold, and position the air cleaner to one side to allow access to the carburettor and stepper motor.
21 Reconnect the battery negative lead.
22 Connect a tachometer to the engine in accordance with the manufacturer’s instructions.
23 Start the engine, then check and if necessary adjust the idle mixture.
24 Ensure that all electrical loads are switched off (headlamps, heater blower etc). If the “idle speed adjustment” wire is earthed, temporarily isolate it. Where applicable, ensure that the automatic transmission gear selector lever is in the “N” or “P” position.
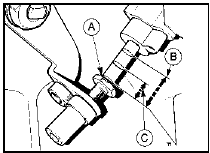
25 Accelerate the engine to a speed greater than 2500 rpm, allow it to return to idle, then repeat. Insert a feeler blade of 1.0 mm (0.04 in) thickness between the stepper motor plunger and the adjusting screw (see illustration).

19.25 Carburettor stepper motor adjustment - 2.0 litre models with ESC II
system
A Locknut B Feeler blade
With the feeler blade in place the engine speed should be 875 ± 25 rpm.
26 If adjustment is necessary, remove the tamperproof cap from the adjusting screw locknut. Slacken the locknut, then turn the adjusting screw to achieve the correct engine speed and tighten the locknut.
27 Repeat the procedure given in paragraph 24 and check that the engine speed is still correct. Readjust if necessary.
28 Stop the engine, remove the feeler blade, and disconnect the tachometer.
29 Refit the air cleaner, ensuring that the vacuum hose is securely connected. If the “idle speed adjustment” wire was previously earthed, reconnect it.
30 Re-start and then stop the engine, observing the movement of the stepper motor plunger. Immediately after stopping the engine, the plunger should move to the “anti-dieselling” position, and after a few seconds it should extend to the “vent manifold/start” position (see illustration).
19.30 Carburettor stepper motor plunger positions - 2.0 litre models with ESC
II system
A Vent manifold/start
B Anti-dieselling
C Normal idle
31 Re-check and adjust the idle mixture.
32 If necessary, refit the tamperproof caps to the mixture adjustment screw and the stepper motor adjustment screw locknut.
Crankshaft speed/position sensor
(2.0 litre DOHC models)
33 The sensor is located at the right-hand
rear of the cylinder block behind the oil filter.
34 Disconnect the battery negative lead.
35 Access is most easily obtained from underneath the vehicle. To improve access, apply the handbrake, then jack up the front of the vehicle and support it securely on axle stands (see “Jacking and Vehicle Support”).
36 Disconnect the wiring plug from the sensor.
37 Remove the securing screw, and withdraw the sensor from its location in the cylinder block (see illustration).
19.37 Removing the crankshaft speed/position sensor (engine removed)
38 Before refitting the sensor, examine the O-ring, and renew it if damaged or worn.
39 Refitting is a reversal of removal, noting the torque setting for the sensor screw.
See also:
Ignition systems
The ignition system is divided into two circuits, low tension
(primary) and high tension (secondary). The low tension circuit consists of the
battery, ignition switch, primary coil windings and th ...
Wheel sensor (ABS) - removal and refitting
Note: A new O-ring must be used when
refitting a sensor.
Front wheel sensor
1 Apply the handbrake, loosen the relevant
front roadwheel nuts, then jack up the front of
the vehicle and support on a ...
Bumper components - removal and refitting
Bumper overriders
Removal
1 On pre-1986 models the overrider is held to
the bumper by a clamp screw. Find this screw
on the underside of the bumper and release it
- the overrider can then be with ...
