EEC IV system components - removal and refitting
Note: Procedures for removal and refitting of the ignition system components and electronic module are given elsewhere in the relevant Sections of this Chapter.
Engine coolant temperature
sensor
2.0 litre SOHC fuel injection models
1 For details of engine coolant temperature
sensor removal and refitting, refer to the
Section appertaining to the ESC II system.
1.6 and 1.8 litre (R6A type) CVH models 2 The sensor is located in the side of the inlet manifold.
3 Disconnect the battery negative lead.
4 Partially drain the cooling system.
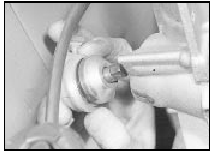
5 Disconnect the sensor wiring plug by pulling on the plug, not the wiring (see illustration).
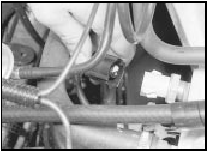
21.5 Disconnecting the engine coolant temperature sensor wiring plug
6 Unscrew the sensor from the inlet manifold and remove it.
7 Refitting is a reversal of removal. Refill the cooling system.
2.0 litre DOHC fuel injection models 8 The sensor is located in the side of the inlet manifold, behind the throttle body. The removal and refitting procedure is as described for the 1.6 and 1.8 litre (R6A type) CVH models above.
Crankshaft speed/position sensor
1.6 and 1.8 litre (R6A type) CVH
models
1.6 litre
9 The sensor is located at the left-hand rear
of the cylinder block, above the starter motor
(see illustration).
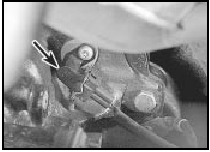
21.9 Crankshaft speed/position sensor (arrowed) viewed from front of engine
with shroud removed
10 Disconnect the battery negative lead.
11 Remove the securing screw, and withdraw the sensor shroud.
12 Disconnect the sensor wiring plug.
13 Remove the Torx securing screw, and withdraw the sensor.
14 Refitting is a reversal of removal.
1.8 litre
15 Proceed as described for the ESC Hybrid
module. If a new sensor (not the original unit)
is being fitted, position it in the mounting
bracket so that it is in actual contact with one
of the teeth of the toothed wheel on the
crankshaft. Hold the sensor in this position,
and tighten the clamping screw. New sensors
have projections on their base, which will
wear away when the engine is cranking, and
automatically set the specified clearance.
2.0 litre DOHC fuel injection models 16 This procedure is as described for the 2.0 litre DOHC carburettor models (ESC II module).
Air charge temperature sensor
1.6 and 1.8 litre (R6A type) CVH
models
17 The sensor is located in the side of the
CFI unit on 1.6 litre engines (see illustration),
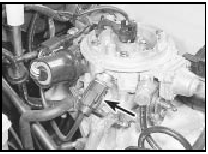
21.17 Air charge temperature sensor location on 1.6 litre engines (arrowed)
and on the inlet manifold on 1.8 litre engines.
18 Disconnect the battery negative lead.
19 Disconnect the sensor wiring plug by pulling on the plug, not the wiring.
20 Unscrew the sensor from its location, and remove it.
21 Refitting is a reversal of removal, but coat the threads of the sensor with suitable sealant before fitting.
2.0 litre DOHC fuel injection models 22 The sensor is located in the upper section of the inlet manifold.
23 Disconnect the battery negative lead.
24 Disconnect the sensor wiring plug by pulling on the plug, not the wiring (see illustration).
21.24 Disconnecting the air charge temperature sensor wiring plug
25 Unscrew the sensor from the inlet manifold, and remove it.
26 Refitting is a reversal of removal, noting the torque setting for the sensor.
Vehicle speed sensor
1.6 and 1.8 litre CVH (R6A type) and
2.0 litre DOHC fuel injection models
27 The sensor is located in the left-hand side
of the gearbox/transmission.
28 Disconnect the battery negative lead.
29 Jack up the vehicle and support it securely on axle stands (see “Jacking and Vehicle Support”).
30 Detach the sensor wiring connector from its bracket, and separate the two halves of the connector.
31 Unscrew the securing bolt, and withdraw the wiring connector bracket, noting its orientation.
32 Withdraw the sensor from the gearbox/transmission casing (see illustration).
21.32 Withdrawing the vehicle speed sensor from the gearbox casing
33 Before refitting the sensor, examine the O-ring, and renew if damaged or worn.
34 Refitting is a reversal of removal, ensuring that the wiring connector bracket is correctly located.
Manifold absolute pressure (MAP)
sensor
1.6 and 1.8 litre CVH (R6A type) and
2.0 litre DOHC fuel injection models
35 The sensor is located at the rear righthand
side of the engine compartment (see
illustration).
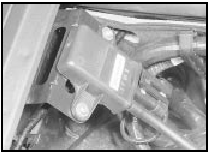
21.35 Manifold absolute pressure (MAP) sensor location
36 Disconnect the battery negative lead.
37 Remove the two screws securing the sensor to the body panel, and carefully withdraw the sensor, taking care not to strain the wiring.
38 Disconnect the wiring plug from the sensor, pulling on the plug, not the wiring, then disconnect the vacuum hose and remove the sensor.
39 Refitting is a reversal of removal.
Fuel temperature sensor -
removal and refitting
2.0 litre DOHC fuel injection models
40 The sensor is located in the top of the fuel
rail.
41 Disconnect the battery negative lead, and to improve access, disconnect the wiring plug from the air charge temperature sensor (in the inlet manifold). Disconnect the sensor wiring plug by pulling on the plug, not the wiring.
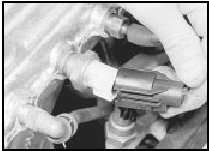
42 Disconnect the fuel temperature sensor wiring plug, again pulling on the plug (see illustration).
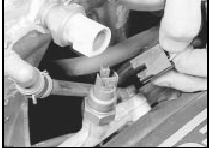
21.42 Disconnecting the fuel temperature sensor wiring plug
43 Unscrew the sensor from the fuel rail, and remove it.
44 Refitting is a reversal of removal, noting the torque setting for the sensor.
See also:
Ignition timing - adjustment for use with unleaded petrol
Note: Refer to the Specifications Section at
the beginning of this Chapter for ignition
timing values for use with unleaded petrol.
1 To run an engine on unleaded petrol,
certain criteria must be ...
Fuel system - depressurising
Warning: The fuel system will
remain pressurised after the
engine is switched off. Comply
with relevant safety precautions
during this operation and refer to the
“Safety First” Section at the beg ...
Starter motor - brush renewal
Bosch long frame and JF, and
Cajavec types
1 With the starter motor removed from the
vehicle and cleaned, grip the unit in a vice
fitted with soft jaw protectors.
2 Remove the two screws securing ...
