Brake hydraulic system (conventional braking system) - bleeding
Caution: Refer to the precautions in Section 1.
General
1 If any of the hydraulic components in the
braking system have been removed or
disconnected, or if the fluid level in the
reservoir has been allowed to fall appreciably,
it is inevitable that air will have been
introduced into the system. The removal of all
this air from the hydraulic system is essential
if the brakes are to function correctly, and the
process of removing it is known as bleeding.
2 Where an operation has only affected one circuit (front or rear) of the hydraulic system, then it will only be necessary to bleed the relevant circuit. If the master cylinder has been disconnected and reconnected, or the fluid level has been allowed to fall appreciably, then the complete system must be bled.
3 One of three methods can be used to bleed the system.
Bleeding
Two-man method
4 Gather together a clean jar and a length of
rubber or plastic bleed tubing which will fit the
bleed screws tightly. The help of an assistant
will be required.
5 Remove the dust cap where fitted, and clean around the bleed screw on the relevant caliper or wheel cylinder, then attach the bleed tube to the screw (see illustration). If the complete system is being bled, start at the front left-hand caliper.
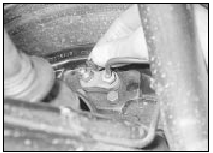
2.5 Removing the dust cap from a wheel cylinder bleed screw
6 Check that the fluid reservoir is topped up and then destroy the vacuum in the brake servo by giving several applications of the brake pedal.
7 Immerse the open end of the bleed tube in the jar which should contain two or three inches of hydraulic fluid. The jar should be positioned about 300 mm (12.0 in) above the bleedscrew to prevent any possibility of air entering the system down the threads of the bleed screw when it is slackened.
8 Open the bleed screw half a turn and have your assistant depress the brake pedal slowly to the floor and then, after the bleed screw is retightened, quickly remove his foot to allow the pedal to return unimpeded. Repeat the procedure.
9 Observe the submerged end of the tube in the jar. When air bubbles cease to appear, tighten the bleed screw when the pedal is being held fully down by your assistant.
10 Top-up the fluid reservoir. It must be kept topped up throughout the bleeding operations. If the connecting holes to the master cylinder are exposed at any time due to low fluid level, then air will be drawn into the system and work will have to start all over again.
11 Assuming that the complete system is being bled, the procedure described in the preceding paragraphs should be repeated on the front right-hand caliper followed by the rear right-hand and left-hand wheel cylinders.
12 On completion, remove the bleed tube, and discard the fluid which has been bled from the system unless it is required for bleed jar purposes. Never re-use old fluid.
13 On completion of bleeding, top-up the fluid level in the reservoir. Check the action of the brake pedal, which should be firm and free from any “sponginess” which would indicate that air is still present in the system.
With one-way valve
14 There are a number of one-man brake
bleeding kits currently available from motor
accessory shops. It is recommended that one
of these kits should be used whenever
possible, as they greatly simplify the bleeding
operation and also reduce the risk of expelled
air or fluid being drawn back into the system.
15 Proceed as described in paragraphs 5 and 6.
16 Open the bleed screw half a turn then depress the brake pedal to the floor and slowly release it. The one-way valve in the bleeder device will prevent expelled air from returning to the system at the completion of each stroke. Repeat this operation until clear hydraulic fluid, free from air bubbles, can be seen coming through the tube. Tighten the bleed screw.
17 Proceed as shown in paragraphs 11 to 13.
With pressure bleeding kit 18 These too are available from motor accessory shops and are usually operated by air pressure from the spare tyre.
19 By connecting a pressurised container to the master cylinder fluid reservoir, bleeding is then carried out by simply opening each bleed screw in turn and allowing the fluid to run out, rather like turning on a tap, until no air bubbles are visible in the fluid being expelled.
20 Using this system, the large reserve of fluid provides a safeguard against air being drawn into the master cylinder during the bleeding operations.
21 This method is particularly effective when bleeding “difficult” systems or when bleeding the entire system at time of routine fluid renewal.
22 Begin bleeding with reference to paragraphs 5 and 6 and proceed as described in paragraphs 11 to 13.
See also:
Steering tie-rod outer balljoint - renewal
1 If as the result of inspection the tie-rod
outer balljoints are found to be worn, remove
them as described in Section 20.
2 When the balljoint nuts are unscrewed, it is
sometimes found that the ...
Diagram 4b: 1986-on KE-Jetronic fuel injection
Diagram 4b: 1986-on KE-Jetronic fuel injection For starting and charging
circuits see Diagram 1a ...
Engine - refitting (automatic transmission in vehicle)
1 Reverse the procedure described in
Section 9, noting the following points.
2 Check that the engine adapter plate is
correctly positioned on its locating dowels.
3 As the torque converter is only ...
