Rear disc caliper - removal, overhaul and refitting
Note: Complete dismantling of the rear caliper should not be attempted unless Ford spring compressor (tool No 12-007) is available, or unless the problems likely to arise in the absence of the tool are understood. Renewal of the piston seal dust-excluding seal and piston adjuster nut seal requires no special tools.
Caution: Refer to the
precautions in Section 1.
Removal
1 With the ignition switched off, pump the
brake pedal at least 20 times, or until it
becomes hard, to depressurise the system.
2 Chock the front wheels, slacken the relevant roadwheel nuts, then jack up the rear of the vehicle and support on axle stands (see “Jacking and Vehicle Support”). Remove the roadwheel and release the handbrake.
3 Where applicable, disconnect the wiring to the disc pad wear sensor.
4 Proceed as described in Section 6, paragraphs 2 and 3, but note that the rigid brake pipe is clipped to the suspension lower arm.
5 Unscrew and remove the two guide bolts securing the caliper to the carrier bracket, while holding the pins with a spanner. Unhook the handbrake cable from the lever, and withdraw the caliper. Alternatively, the two carrier bracket-to-hub carrier bolts can be unscrewed, and the caliper and carrier can be separated on the bench, but in this case the handbrake cable must be disconnected from the carrier bracket by removing the retaining circlip.
Overhaul
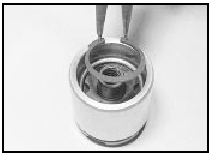
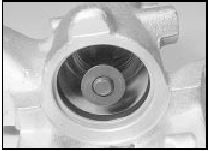
6 Clean the caliper, taking care not to inhale
any dust which may be injurious to health, and
mount it in a soft-jawed vice.
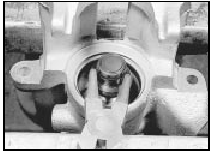
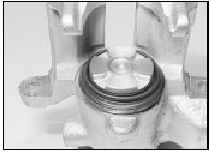
7 Rotate the piston anti-clockwise, using Ford tool No 12-006, or a pair of circlip pliers or similar tool, until it protrudes from the caliper bore by approximately 20.0 mm (0.8 in). Free the dust-excluding seal from the groove in the piston, then continue unscrewing the piston and remove it. Remove and discard the dust-excluding seal.
8 The piston and bore may now be cleaned and examined as described in Section 6, paragraph 12.
9 The piston adjuster nut seal should be renewed as follows.
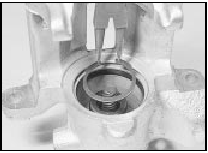
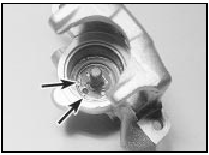
10 Remove the circlip from the piston, then extract the thrustwashers, wave washer and thrust bearing. Note the fitted sequence of these components. Finally remove the nut (see illustrations).
7.10a Remove the circlip from the rear caliper piston . . .
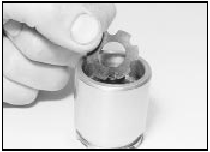
7.10b . . . followed by the thrustwasher . . .
7.10c . . . a wave washer and (not shown) another thrustwasher . . .
7.10d . . . then the thrust bearing . . .

7.10e . . . and finally the adjuster nut itself. Note the seal (arrowed) on
the nut
11 Remove the seal from the nut, noting which way round it is fitted. Clean the nut with methylated spirit. Lubricate the new seal with clean hydraulic fluid and fit it to the nut.
12 If no further dismantling is required, proceed to paragraph 20.
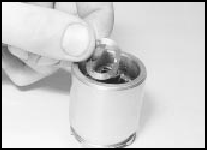
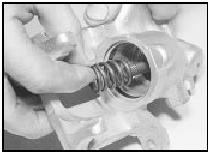
13 For further dismantling it is virtually essential to have Ford tool 12-007 in order to compress the adjuster spring. This tool appears to be a cut-down adjuster nut with a handle for turning it. In the workshop it was found that the actual piston adjuster nut could be used to compress the spring if it were turned with circlip pliers (see illustration).
7.13 Using the piston adjuster nut to compress the adjuster spring
This works well enough for dismantling, but reassembly proved extremely difficult because of the limited clearance between the skirt of the nut and the caliper bore.
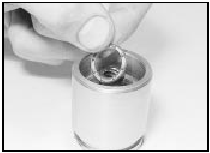
14 Having compressed the adjuster spring just enough to take the load off the circlip, release the circlip inside the caliper bore.
Remove the spring compressor, then extract the circlip, spring cover, spring and washer (see illustrations).
7.14a Extract the circlip from the caliper bore . . .
7.14b . . . then the spring cover . . .
7.14c . . . the spring itself . . .
7.14d . . . and the washer
15 A long thin pair of circlip pliers will now be required to release the key plate retaining circlip from the caliper bore (see illustration).
7.15 Remove the circlip (ends arrowed) to release the pushrod and key plate
With the circlip removed, the pushrod and key plate can be pulled out.
16 Remove the handbrake strut from the caliper bore.
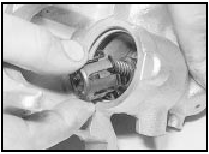
17 Remove the handbrake lever return spring and stop bolt. Pull the lever and shaft nut out of the caliper. Prise out the shaft seal (see illustration).
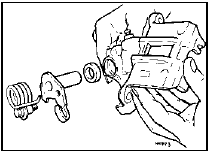
7.17 Handbrake shaft and associated components
18 Clean the handbrake shaft using wire wool; renew the shaft if it is badly corroded.
The shaft bush in the caliper can also be renewed if necessary. Pull out the old bush with an internal puller or slide hammer, and press in the new bush to 7.5 mm (0.30 in) below the shaft seal lip (see illustration). The slot in the side of the bush must line up with the pushrod bore in the caliper.
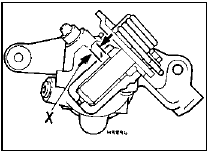
7.18 Handbrake shaft bush correctly fitted
X = 7.5 mm (0.30 in)
19 Having renewed components as necessary, commence reassembly by smearing a little brake grease or anti-seize compound on the handbrake shaft and bush.
20 Fit a new handbrake shaft seal to the caliper. Pass the shaft through the seal and into the caliper, taking care not to damage the seal lips.
21 Refit the handbrake lever stop bolt and return spring.
22 Refit the handbrake strut, lubricating it with brake grease.
23 Fit a new O-ring to the base of the pushrod. Refit the pushrod and the key plate, engaging the pip on the key plate with the recess in the caliper. Secure the key plate with the circlip.
24 Refit the washer, spring and spring cover.
Compress the spring and refit the circlip, then release the spring compressor.
25 Lubricate the caliper bore with clean hydraulic fluid and fit a new piston seal.
26 Reassemble the piston components.
Lubricate the contact face of the adjuster nut with a little brake grease, then fit the adjuster nut (with new seal), thrust bearing, thrustwasher, wave washer and the second thrustwasher. Secure with the circlip.
27 Fit a new dust-excluding seal to the grooves in the piston and caliper bore as the piston is refitted (see illustration). Screw the piston into the caliper bore with the tool used during removal.
7.27 Dust-excluding seal fitted to piston and caliper bore
28 Renew the guide pin gaiters and apply a little brake grease or anti-seize compound to the guide pins when refitting the caliper to its carrier bracket.
Refitting
29 Refitting is a reversal of removal, but on
completion bleed the rear brake circuit and
check the operation of the handbrake.
See also:
Engine electrical systems
General information and precautions
General information
The electrical system is of the 12 volt
negative earth type, and consists of a 12 volt
battery, alternator with integral voltage
regulator, ...
Diagram 2: 1980-86 Lighting all models
Diagram 2: 1980-86 Lighting all models ...
Camshafts and cam followers - removal, inspection and refitting
Note: Once the timing chain has been
removed from the camshaft sprockets, do not
turn the crankshaft until the timing chain has
been correctly refitted - this is to prevent
contact between the val ...
