Tailgate lock (Hatchback and Estate models) - removal and refitting
Removal
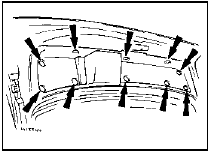
1 Open the tailgate and prise out the trim
panel using a wide-bladed screwdriver (see
illustration).

12.1 Tailgate trim panel fixings - Hatchback and Estate models
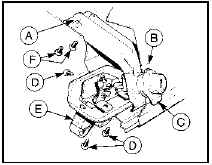
2 Remove the lock barrel retaining clip, and where applicable disconnect the operating lever from the central locking solenoid/motor, then withdraw the lock barrel (see illustration). Central locking solenoid/motor removal and refitting is covered in Chapter 13.

12.2 Tailgate lock assembly - Hatchback and Estate models
A Lock barrel support bracket
B Lock barrel retaining clip
C Lock barrel
D Torx screw
E Lock assembly
F Screws
3 Remove the two securing screws and detach the lock barrel support bracket from the tailgate.
4 Where applicable, disconnect the battery negative lead, the earth lead from the tailgate and the “tailgate ajar” sensor wiring plug.
Unclip the luggage compartment light switch from the lock assembly, where applicable.
5 Remove the securing screws and withdraw the lock assembly.
Refitting
6 Refitting is a reversal of removal, but do not
tighten the lock barrel support bracket screws
until the lock barrel has been fitted.
Tailgate strut (Hatchback and Estate models) - removal and refitting
Removal
1 Support the tailgate in the open position
using a prop, or with the aid of an assistant.
2 Disconnect the strut from the tailgate by prising out the retaining clip. Do not remove the clip completely, just raise it by a maximum of 4.0 mm (0.16 in) and then pull the strut off its mounting.
3 Pull the strut from the pivot stud on the body.
Refitting
4 Refitting is a reversal of removal.
See also:
Electrical fault finding - general information
Refer to Chapter 12. ...
Air cleaner element renewal (Every 24 000 miles (40 000 km) or 2 years)
Carburettor models
1 Remove the screws from the top of the air
cleaner cover (see illustration).
38.1 Remove the air cleaner cover screws . . .
2 Where applicable release the spring clips
aroun ...
Specifications
General
System type . . . . . . . . . . . . . . . . . . . . . . . . . . . . . . . . . .
. . . . . . . . . . . . Single-point electronic fuel injection
Application . . . . . . . . . . . . . . . . . ...
