Handbrake cable - removal and refitting
Removal
1 Chock the front wheels, loosen the rear
roadwheel nuts, then jack up the rear of the
vehicle and support on axle stands. Release
the handbrake and remove the roadwheels.
2 Slacken the handbrake cable adjuster.
3 Extract the securing circlip and pivot pin, and detach the handbrake equaliser from the linkage on the underbody (see illustration).
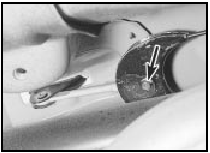
27.3 Handbrake equaliser securing circlip (arrowed) and pivot pin
4 On models with a conventional braking system, remove the brake shoes and disconnect the handbrake cables from the operating levers, then disconnect the cables from the brake backplates by extracting the U-clips.
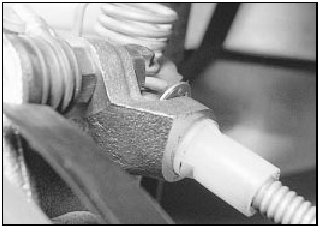
5 On models with ABS, unhook the handbrake cables from the operating levers on the calipers, then disconnect the cables from the caliper carrier brackets by removing the retaining circlips (see illustrations).

27.5a Handbrake cable-to-operating lever attachment - ABS
27.5b Handbrake cable-to-caliper carrier bracket attachment - ABS
6 On Saloon, Hatchback and Estate models bend back the tangs and release the cables from the lower suspension arms, then feed the cables through the holes in the suspension crossmember and release them from the brackets on the underbody, noting that the right-hand cable is retained by a circlip (see illustration). Withdraw the cable assembly from the vehicle.
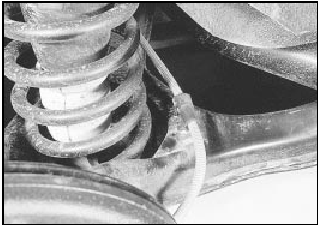
27.6 Handbrake cable-to-lower suspension arm attachment
7 On P100 models, release the cables from the brackets on the chassis crossmember, noting that the left-hand cable is retained by a circlip, then unhook the cable support springs and withdraw the cable assembly from the vehicle (see illustration).
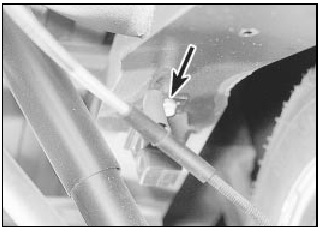
27.7 Handbrake cable support spring (arrowed)
Refitting
8 Refitting is a reversal of removal. On
models with a conventional braking system
refit the brake shoes.
9 On completion, adjust the cable.
See also:
Anti-lock Braking System - description
1 From 1986 onward an anti-lock braking
system is available as standard or optional
equipment on certain Escort models.
2 The system comprises four main
components: two modulators, one for each
b ...
Front direction indicator lamp unit - removal and refitting
1 Disconnect the battery negative lead.
Models up to 1987
Low specification
2 Push the lamp unit rearwards into the
bumper until the plastic retaining tang is heard
to click in the locked positio ...
Method of engine removal
Warning: Vehicles equipped
with air conditioning:
Components of the air
conditioning system may
obstruct work being undertaken on the
engine, and it is not always possible to
unbolt and move the ...
