Front wheel bearings - renewal
1 Remove the hub carrier.
2 Reverse the roadwheel nuts and screw them fully onto the studs to protect the threads, then mount the hub carrier assembly in a vice as shown (see illustration).
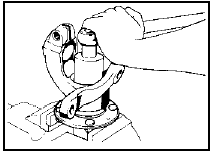
6.2 Front hub carrier mounted in vice to unscrew hub nut
3 Prise the dust cap from the rear of the hub carrier, and unscrew the hub nut with a suitable socket. Note that on all models manufactured before late December 1982, both left and right-hand nuts have a right-hand thread, but as from this date, left-hand thread assemblies were progressively fitted to the right-hand hub carrier. The modified right-hand hub can be identified by the letter “R” stamped on its outer face, or by the colour of the hub nut nylon insert, blue indicates a normal right-hand thread, and yellow indicates a left-hand thread.
4 Remove the splined washer, and tap the hub carrier from the drive flange. Recover the bearing inner race and rollers from the inner end of the hub carrier (see illustration).
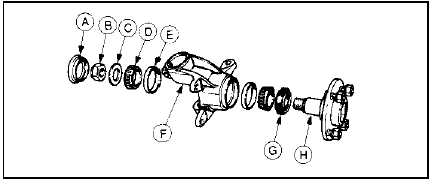
6.4 Front hub components
A Dust cap
B Hub nut
C Splined washer
D Taper roller bearing
E Bearing outer race
F Hub carrier
G Oil seal
H Drive flange
5 Prise the oil seal from the outer end of the hub carrier and remove the remaining bearing inner race and rollers.
6 Using a soft metal drift, drive the bearing outer races from the hub carrier, taking care not to damage the inner surface of the carrier.
7 Clean the hub carrier and drive flange with paraffin, wipe dry and examine for damage and wear. Note that the components are machined to very close tolerances, and the bearings are supplied in matched pairs, therefore scrupulous cleanliness must be observed.
8 Using a metal tube of suitable diameter, drive the new bearing outer races fully into the hub carrier. Ensure that the races are seated correctly.
9 Pack the inner bearing races and rollers with high-melting-point lithium-based grease, and locate the outer bearing assembly in the hub camber.
10 Fill the cavities between the sealing lips of the oil seal with grease, then drive it fully into the hub carrier using a block of wood or a metal tube of suitable diameter. Note that on early models the oil seal has a rubber casing, and this early type of seal should be replaced with the later type which has a metal casing.
The oil seal should be renewed regardless of type, and a new seal of the correct type is normally supplied with the new wheel bearings.
11 With the drive flange mounted in a vice, as during dismantling, tap the hub carrier onto the drive flange.
12 Fit the inner bearing assembly, tapping it into place with a metal tube of suitable diameter if necessary, and fit the splined washer. Note that the bearings are self-setting on assembly, and no subsequent adjustment is required.
13 Refit the hub nut and tighten it to the specified torque.
14 Tap the dust cap into position in the hub carrier.
15 Remove the assembly from the vice, remove the roadwheel nuts, and refit the hub carrier.
See also:
ESC II system components - removal and refitting
Note: Procedures for removal and refitting of
the ignition system components and
electronic module are given elsewhere in the
relevant Sections of this Chapter.
1 Disconnect the battery negative l ...
Rear anti-roll bar (Saloon, Hatchback and Estate models) - removal and
refitting
Removal
1 Loosen the rear roadwheel nuts, chock the
front wheels, jack up the rear of the vehicle
and support on axle stands placed under the
side members.
2 Prise off the straps which connect th ...
Turbocharger - general description
Escort RS Turbo models are equipped with
an exhaust driven turbocharger, which is a
device designed to increase the engine’s
power output without increasing exhaust
emissions or adversely affectin ...
