Rear suspension lower arm (Saloon, Hatchback and Estate models) - removal and refitting
Models with rear drum brakes
Removal
1 Chock the front wheels, jack up the rear of
the vehicle and support on axle stands placed
under the side members.
2 Remove the relevant driveshaft.
3 Remove the handbrake cable from the clip on the lower arm.
4 Unscrew the brake pipe from the brake hose at the bracket on the lower arm. Plug the ends of the pipe and hose to prevent leakage and dirt ingress, then detach the hose from the bracket by removing the U-shaped retaining clip (see illustration).
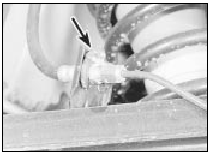
11.4 Brake pipe bracket on lower arm. Ushaped retaining clip arrowed
5 Unscrew the brake pipe from the wheel cylinder on the brake backplate and plug the end of the pipe and the cylinder to prevent leakage and dirt ingress.
6 Unscrew the bolts securing the brake backplate to the lower arm and tie the backplate to one side.
7 Where applicable, prise the anti-roll bar connecting strap from the lower arm.
8 Support the lower arm on a jack, and raise it slightly to place the coil spring under load.
9 Remove the shock absorber.
10 Unscrew and remove the three bolts securing the front guide plate to the underbody and the suspension crossmember (see illustration). Where applicable, bend back the lockwasher tab(s) on the larger bolt.
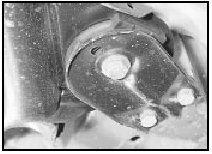
11.10 Rear suspension front guide plate
11 Lower the lower arm, and remove the coil spring and rubber cup.
12 Note the orientation of the two lower arm-to-crossmember pivot bolts and nuts, then unscrew and remove them and withdraw the lower arm from under the vehicle (see illustration).
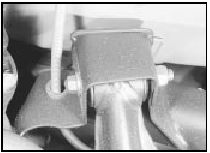
11.12 Lower arm-to-crossmember inner pivot
13 If the lower arm is to be renewed, unclip the brake pipe, and refit to the new arm.
14 If required, the pivot bushes may be renewed using a long bolt, nut, washers and a suitable metal tube. Lubricate the new bushes with soapy water before fitting.
Refitting
15 Refitting is a reversal of removal, bearing
in mind the following points.
16 Where applicable, secure the larger front guide plate bolt by bending up the lockwasher tab(s).
17 Before tightening the lower arm-to-crossmember pivot bolts and nuts, lower the vehicle so that its weight is resting on the roadwheels, and bounce the vehicle to settle the suspension. Ensure that the bolts are orientated as noted during removal.
18 On completion, bleed the brakes and adjust the handbrake.
Models with rear disc brakes Note: A suitable puller will be required to remove the drive flange, and a new rear hub nut must be used on reassembly.
Removal
19 With the vehicle resting on its wheels,
loosen the rear hub nut. A suitable extension
bar will be required, as the nut is extremely
tight. Note that the left-hand nut has a
left-hand thread, ie it is undone in a clockwise
direction. Before loosening the nut, ensure
that the handbrake is applied, and chock the
relevant rear wheel.
20 Loosen the rear roadwheel nuts on the side concerned, chock the front wheels, jack up the rear of the car and support on axle stands placed under the side members.
21 Remove the rear roadwheel.
22 Remove the rear section of the exhaust system - ie from the joint.
23 Unscrew the brake pipe from the brake hose at the bracket on the lower arm (see illustration). Plug the ends of the pipe and hose to prevent leakage and dirt ingress, then detach the hose from the bracket by removing the U-shaped retaining clip.
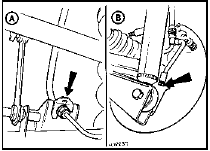
11.23 Rear suspension lower arm brake pipe brackets (arrowed)
A Left-hand bracket B Right-hand bracket
24 Remove the handbrake cable from the clip on the lower arm.
25 Unbolt the brake caliper and tie it to one side, taking care not to strain the brake hose.
26 Mark the position of the brake disc in relation to the hub, remove the retaining spire washer(s), and remove the disc.
27 Disconnect the driveshaft from the hub assembly by unscrewing the six securing bolts. Support the driveshaft to avoid straining the joints, or alternatively, unbolt it from the final drive unit at the inboard end and remove the driveshaft from the vehicle. At all times, avoid bending the driveshaft joints to excessive angles, and do not allow the shaft to hang down from one end.
28 Unscrew and remove the rear hub nut, and using a puller pull off the drive flange.
29 Unscrew the four bolts securing the hub carrier and splash shield to the lower arm.
Remove the hub carrier and splash shield.
Note that the stub axle is retained in the hub carrier.
30 Disconnect the ABS sensor, and detach the lead from the clip on the lower arm.
31 Remove the propeller shaft.
32 Proceed as shown in paragraphs 7 to 14 inclusive.
Refitting
33 Refitting is a reversal of removal, bearing
in mind the following points.
34 Where applicable, secure the larger front guide plate bolt by bending up the lockwasher tabs.
35 When refitting the hub carrier to the lower arm note that there are two types of bolts used . The two types of bolt must not be mixed on a vehicle, but can be changed in complete sets for the alternative type. A complete set is eight bolts, four each side. Note that the two types of bolt have different torque wrench settings.
When renewing the wheel bearings a suitable puller will be required to remove the drive flange, and a new rear hub nut must be used on reassembly.
36 When refitting the drive flange to the hub assembly, use a new hub nut, and leave tightening until the vehicle is resting on its wheels. Apply the handbrake and chock the relevant rear wheel when tightening the nut.
37 When refitting the brake disc, align the previously made marks on disc and hub.
38 Before tightening the lower arm-to-crossmember pivot bolts and nuts, lower the vehicle so that its weight is resting on the roadwheels, and bounce the vehicle to settle the suspension. Ensure that the bolts are orientated as noted during removal.
39 On completion, bleed the brakes and adjust the handbrake.
See also:
Ford Escort Service and Repair Manual
Routine maintenance and servicin
...
Oil pump - dismantling, inspection and reassembly
Note: A new pressure relief valve plug and
pick-up tube gasket will be required for
reassembly.
Dismantling
1 If oil pump wear is suspected, check the
cost and availability of new parts and the c ...
Engine dismantling, examination, renovation and reassembly - general
information
Dismantling
1 Refer to Chapter 2, Part A, Section 18,
paragraphs 1 to 8 inclusive.
2 A suitable selection of splined and Torx
sockets will be required to remove many of
the bolts when dismantling ...
