Tailboard (P100 models) - removal and refitting
Removal
1 Lower the tailboard to the open position.
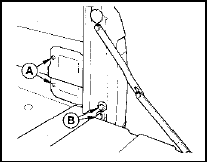
2 Detach the rear lamp wiring cover on one side of the vehicle by removing the two securing screws (see illustration).

24.2 Rear lamp wiring cover screws (A) and tailboard hinge screws (B)
3 Remove the four rear lamp securing nuts, and withdraw the rear lamp assembly.
Disconnect the wiring plug.
4 Raise the tailboard by approximately 20º, lift the centre pivot of one of the support arms, and when the bolt head on the tailboard is aligned with the slot in the support arm, pull the support arm clear. Repeat this procedure for the remaining support arm, and lower the tailboard to the vertical position.
5 On the side of the vehicle from which the rear lamp has been removed, remove the two screws securing the tailboard hinge to the cargo area.
6 Close the tailboard and lever out the hinge.
7 Pull the free end of the tailboard away from the cargo area, and carefully prise the remaining end from its hinge. Withdraw the tailboard from the vehicle.
8 If required, the pivot bushes can be removed from the tailboard for renewal.
Refitting
9 Refitting is a reversal of removal.
See also:
Door interior handle - removal and refitting
Removal
1 Remove the door inner trim panel.
2 Where necessary for improved access, peel
back the waterproof plastic sheet from the
door.
3 Remove the two securing screws in the
case of models up ...
Knock sensor - removal and refitting
Removal
1 The knock sensor is screwed into the
cylinder block, near the oil filter (see
illustration).
15.1 Knock sensor location - 1.4 CFI engine
A Knock sensor
B Wiring plug
C Securing bolt ...
Flywheel/driveplate - removal, inspection and refitting
Note: New flywheel securing bolts must be
used on refitting.
1.8 litre (R2A type)
1 Refer to Section 26, Chapter 2, Part A but
also note the following points.
2 The flywheel/driveplate securing b ...
