Front foglamps - removal and refitting
1 Disconnect the battery negative lead.
Models up to 1987
2 Remove the relevant front direction
indicator lamp unit.
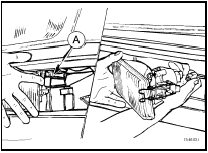
3 Release the retaining catch on the inside edge of the lamp, then withdraw the lamp from the bumper and disconnect the wiring plug (see illustration).

46.3 Front foglamp removal - models up to 1987
A Retaining catch
4 Refitting is a reversal of removal.
Models from 1987
5 Remove the two securing screws, then
withdraw the lamp forwards and disconnect
the two wiring plugs.
6 Refitting is a reversal of removal, but where necessary use a new gasket between the lamp and bumper.
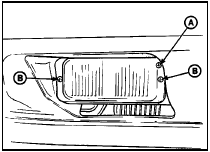
7 On completion, the vertical alignment of the foglamp must be adjusted. For the foglamps, dimension “X” (see illustration, 42.4) should be taken as 220.0 mm (8.7 in). The adjuster screw is located on the inside edge of the lamp above the securing screw (see illustration).

46.7 Front foglamp adjuster screw (A) and securing screws (B) - models from
1987
Rear number plate lamp - removal and refitting
1 Disconnect the battery negative lead.
Saloon, Hatchback and Estate
models
2 To remove a lamp, simply prise it from the
bumper using a thin-bladed screwdriver, and
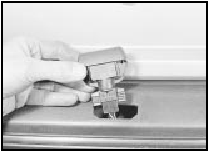
disconnect the wiring plug (see illustration).

47.2 Removing a rear number plate lamp - Saloon, Hatchback and Estate models
3 Refitting is a reversal of removal.
P100 models
4 Working behind the rear crossmember, pull
the wiring plug from its clip and disconnect it.
5 Pull the lamp cover from the rubber housing, then pull the rubber housing and the wiring from the crossmember.
6 Refitting is a reversal of removal.
See also:
Instrument panel - removal and refitting
Pre-1986 models
Removal
1 Disconnect the battery negative terminal.
2 Extract the screws and pull the instrument
panel bezel from the panel. The two clips at
the base of the bezel will release by ...
Battery - testing and charging
Testing
Standard and low maintenance battery
1 If the vehicle covers a small annual mileage
it is worthwhile checking the specific gravity
of the electrolyte every three months to
determine the s ...
Hydraulic pipes and hoses - renewal
Note: Before starting work, refer to the
warning at the beginning of Section 3
concerning the dangers of hydraulic fluid.
1 Always disconnect a flexible hose by
prising out the spring anchor clip ...
