Service recommendations
To help you service your vehicle:
- We highlight do-it-yourself items in the engine compartment for easy location.
- We provide a scheduled maintenance guide which makes tracking routine service easy.
If your vehicle requires professional service, your dealership can provide the necessary parts and service. Check your Warranty Guide/Owner Information Guide to find out which parts and services are covered.
Use only recommended fuels, lubricants, fluids and service parts conforming to specifications. Motorcraft parts are designed and built to provide the best performance in your vehicle.
PRECAUTIONS WHEN SERVICING YOUR VEHICLE
- Do not work on a hot engine.
- Make sure that nothing gets caught in moving parts.
- Do not work on a vehicle with the engine running in an enclosed space, unless you are sure you have enough ventilation.
- Keep all open flames and other burning (cigarettes) material away from the battery and all fuel related parts.
2. Turn off the engine and remove the key.
3. Block the wheels to prevent the vehicle from moving unexpectedly.
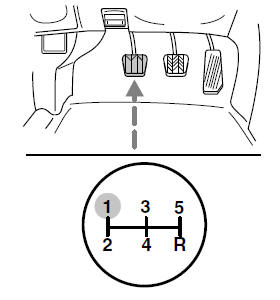
- Manual transaxle:

1. Set the parking brake, depress the clutch and place the gearshift in 1 (First).
2. Turn off the engine and remove the key.
3. Block the wheels to prevent the vehicle from moving unexpectedly.
Working with the engine off
Automatic transaxle:
1. Set the parking brake and shift to P (Park).
2. Turn off the engine and remove the key.
3. Block the wheels.
Manual transaxle:
1. Set the parking brake, depress the clutch and place the gearshift in 1 (First).
2. Turn off the engine and remove the key.
3. Block the wheels.
Working with the engine on
Automatic transaxle:
1. Set the parking brake and shift to P (Park).
2. Block the wheels.
Manual transaxle
1. Set the parking brake, depress the clutch and place the gearshift in N (Neutral).
2. Block the wheels.
Note: Do not start your engine with the air cleaner removed and do not remove it while the engine is running.
OPENING THE HOOD 
1. Inside the vehicle, pull the hood
release handle located under the
bottom left corner of the instrument
panel. 
2. Go to the front of the vehicle and release the auxiliary latch that is located under the front center of the hood.

3. Lift the hood and secure it with the prop rod.
See also:
Front tie-bar - removal and refitting
Pre-May 1983 1.1 litre models
Removal
1 Jack up the front of the car and support it
on stands (see “Jacking and Vehicle Support”).
2 Unscrew and remove the nut which holds
the tie-bar to the larg ...
Specifications
Fuel pump
Type . . . . . . . . . . . . . . . . . . . . . . . . . . . . . . . . . . . . . .
. . . . . . . . . . . . . . Mechanically-operated by eccentric on camshaft
Delivery pressure . . . . . . ...
Temperature gauge sender unit - removal and refitting
Note: Suitable jointing compound will be
required on refitting.
Removal
1 With the engine cold unscrew the pressure
cap on the thermostat housing or expansion
tank as applicable, then refit it. T ...
