Contact breaker points adjustment - models with contact breaker distributor (Every 6000 miles or 6 months)
1 Spring back the retaining clips or undo the screws as appropriate and lift off the distributor cap.
2 Withdraw the rotor arm from the distributor shaft.
3 Using a screwdriver, gently prise the contact breaker points open to examine the condition of their faces. If they are rough, pitted or dirty they should be renewed as described in the next Section.
4 Assuming that the points are in a satisfactory condition or that they have just been renewed, the gap between the two faces should be checked and if necessary adjusted. This can be done using feeler blades as described in the following paragraphs, or preferably by using the more accurate dwell angle method as described from paragraph 8 onwards.
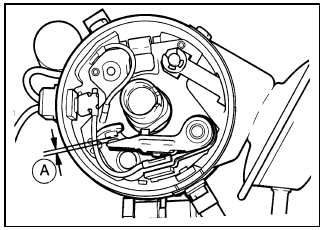
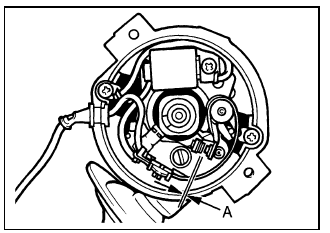
5 To adjust the points using feeler blades, turn the crankshaft using a spanner on the crankshaft pulley bolt until the heel of the contact breaker arm is on the peak of one of the four cam lobes and the points are fully open. A feeler blade of thickness equal to the contact breaker points gap as given in the Specifications should now just slide between the point faces (see illustrations).

13.5a Contact breaker points gap (A) - Bosch distributor

13.5b Contact breaker points gap (A) - Lucas distributor
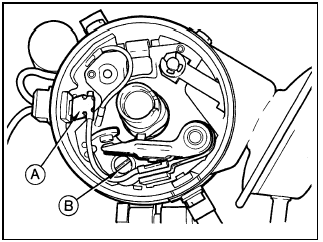
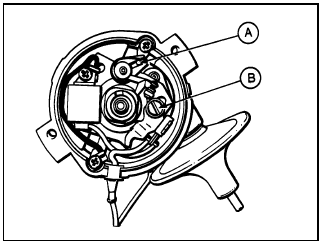
6 If adjustment is required, slacken the retaining screw slightly and move the fixed point as necessary to achieve the desired gap (see illustrations). After adjustment tighten the retaining screw and recheck the gap.

13.6a Contact breaker point components - Bosch distributor A LT lead
connector B Contact breaker retaining screw

13.6b Contact breaker point components - Lucas distributor A Secondary
movement cam and peg B Contact breaker retaining screw
7 Refit the rotor arm and the distributor cap.
8 If a dwell meter is available adjust the contact breaker points by measuring and setting the dwell angle as follows.
9 The dwell angle is the number of degrees of distributor cam rotation during which the contact breaker points are closed; ie the period from when the points close after being opened by one cam lobe, until they are opened again by the next cam lobe. The advantages of setting the points by this method are that any wear of the distributor shaft or cam lobes is taken into account and the inaccuracies associated with using feeler blades are eliminated. Also, on 1.1 litre CVH engines the static ignition timing is accurately set in production and adjustment of the ignition timing in service has been deleted from the maintenance schedule. Therefore dwell angle adjustment is far more critical on these engines.
10 In general a dwell meter should be used in accordance with the manufacturer’s instructions. However, the use of one type of meter is outlined as follows.
11 Remove the distributor cap and rotor arm and connect one lead of the dwell meter to the “+” terminal on the coil and the other lead to the coil “-” terminal.
12 Whilst an assistant turns on the ignition and cranks the engine on the starter, observe the reading on the dwell meter scale. With the engine cranking the reading should be equal to the dwell angle given in the Specifications.
13 If the dwell angle is too small, the contact breaker points gap should be reduced and if the dwell angle is excessive the gap should be increased.
14 Adjust the points gap while the engine is cranking using the method described in paragraph 6. When the dwell angle is satisfactory, disconnect the meter, then refit the rotor arm and distributor cap.
15 Check the ignition timing (Section 14).
See also:
Distributor cap and rotor arm (OHC models) - removal and refitting
SOHC models
1 Disconnect the battery negative lead.
2 Where applicable, unclip the screening can
from the top of the distributor and disconnect
the earth strap (see illustration).
13.2 Unclippi ...
Steering tie-rod outer balljoint - renewal
1 If as the result of inspection the tie-rod
outer balljoints are found to be worn, remove
them as described in Section 20.
2 When the balljoint nuts are unscrewed, it is
sometimes found that the ...
Steering and suspension security check (Every 12 000 miles (20 000 km) or 12
months)
1 Check the shock absorbers by bouncing
the vehicle up and down at each corner in
turn. When released, it should come to rest
within one complete oscillation. Continued
movement, or squeaking and ...
